Departments
Overview
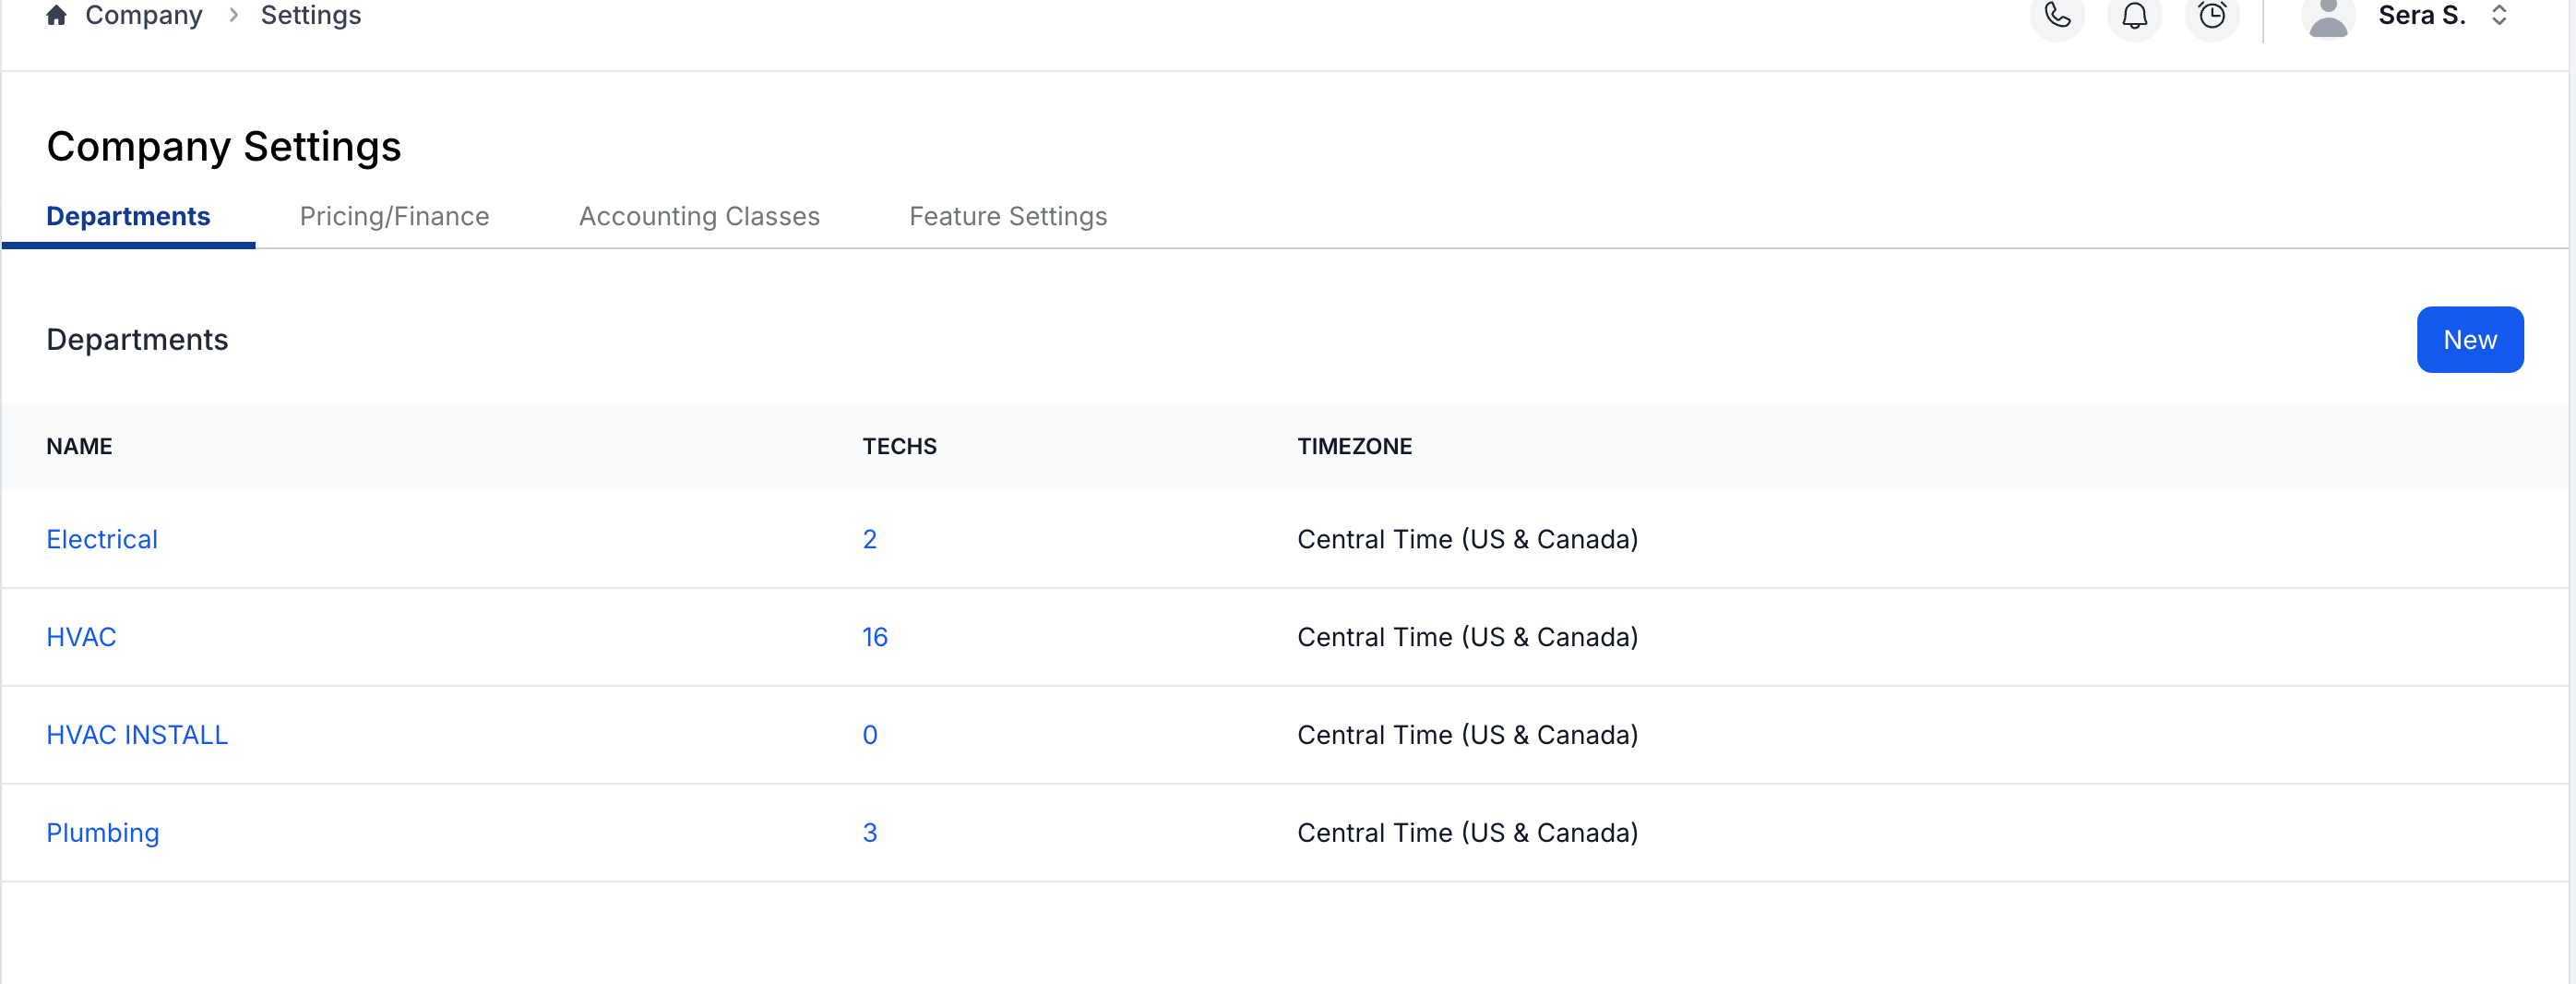
The Departments tab displays all your business departments with key information at a glance:
- Department names (clickable for editing)
- Number of active technicians per department
- Timezone settings for each department
Creating a New Department
Click the New button in the upper right corner.
Required fields:
- Name: Enter your department name
- Timezone: Select the appropriate timezone for this department
- Hourly Labor Cost: Enter the labor cost per hour (critical for COGS calculations)
- Default Billing Terms: Set standard payment terms for this department
- Default Accounting Category: Link to your QuickBooks GL code/account
- Default Accounting Class: Select if using QuickBooks Classes for reporting

Tip About Hourly Labor Cost: This field is used in your COGS equation to configure margin-based pricing in your Pricebook. If you need assistance calculating your hourly labor cost or hourly labor rate, please download our helpful worksheet. Users can change their Hourly Labor Cost by clicking on the department and typing in a new hourly labor cost.
Managing Existing Departments
To edit a department:
- Click on the department name in the list
- Update any settings as needed
- Save your changes
To archive a department:
- Click on the department name
- Select Archive
⚠️ Important Notes About Archiving:
- All technicians in that department will be deactivated
- Pricebook items linked to the department will be archived
- Active jobs remain scheduled but should be reassigned before archiving
- Departments can be unarchived: Click on the department name and select unarchive
- After unarchiving: Technicians and pricebook items will need to be manually unarchived as well
Tip on Archiving: We recommend rescheduling any jobs assigned to a department before archiving it.
Pricing/Finance
Overview
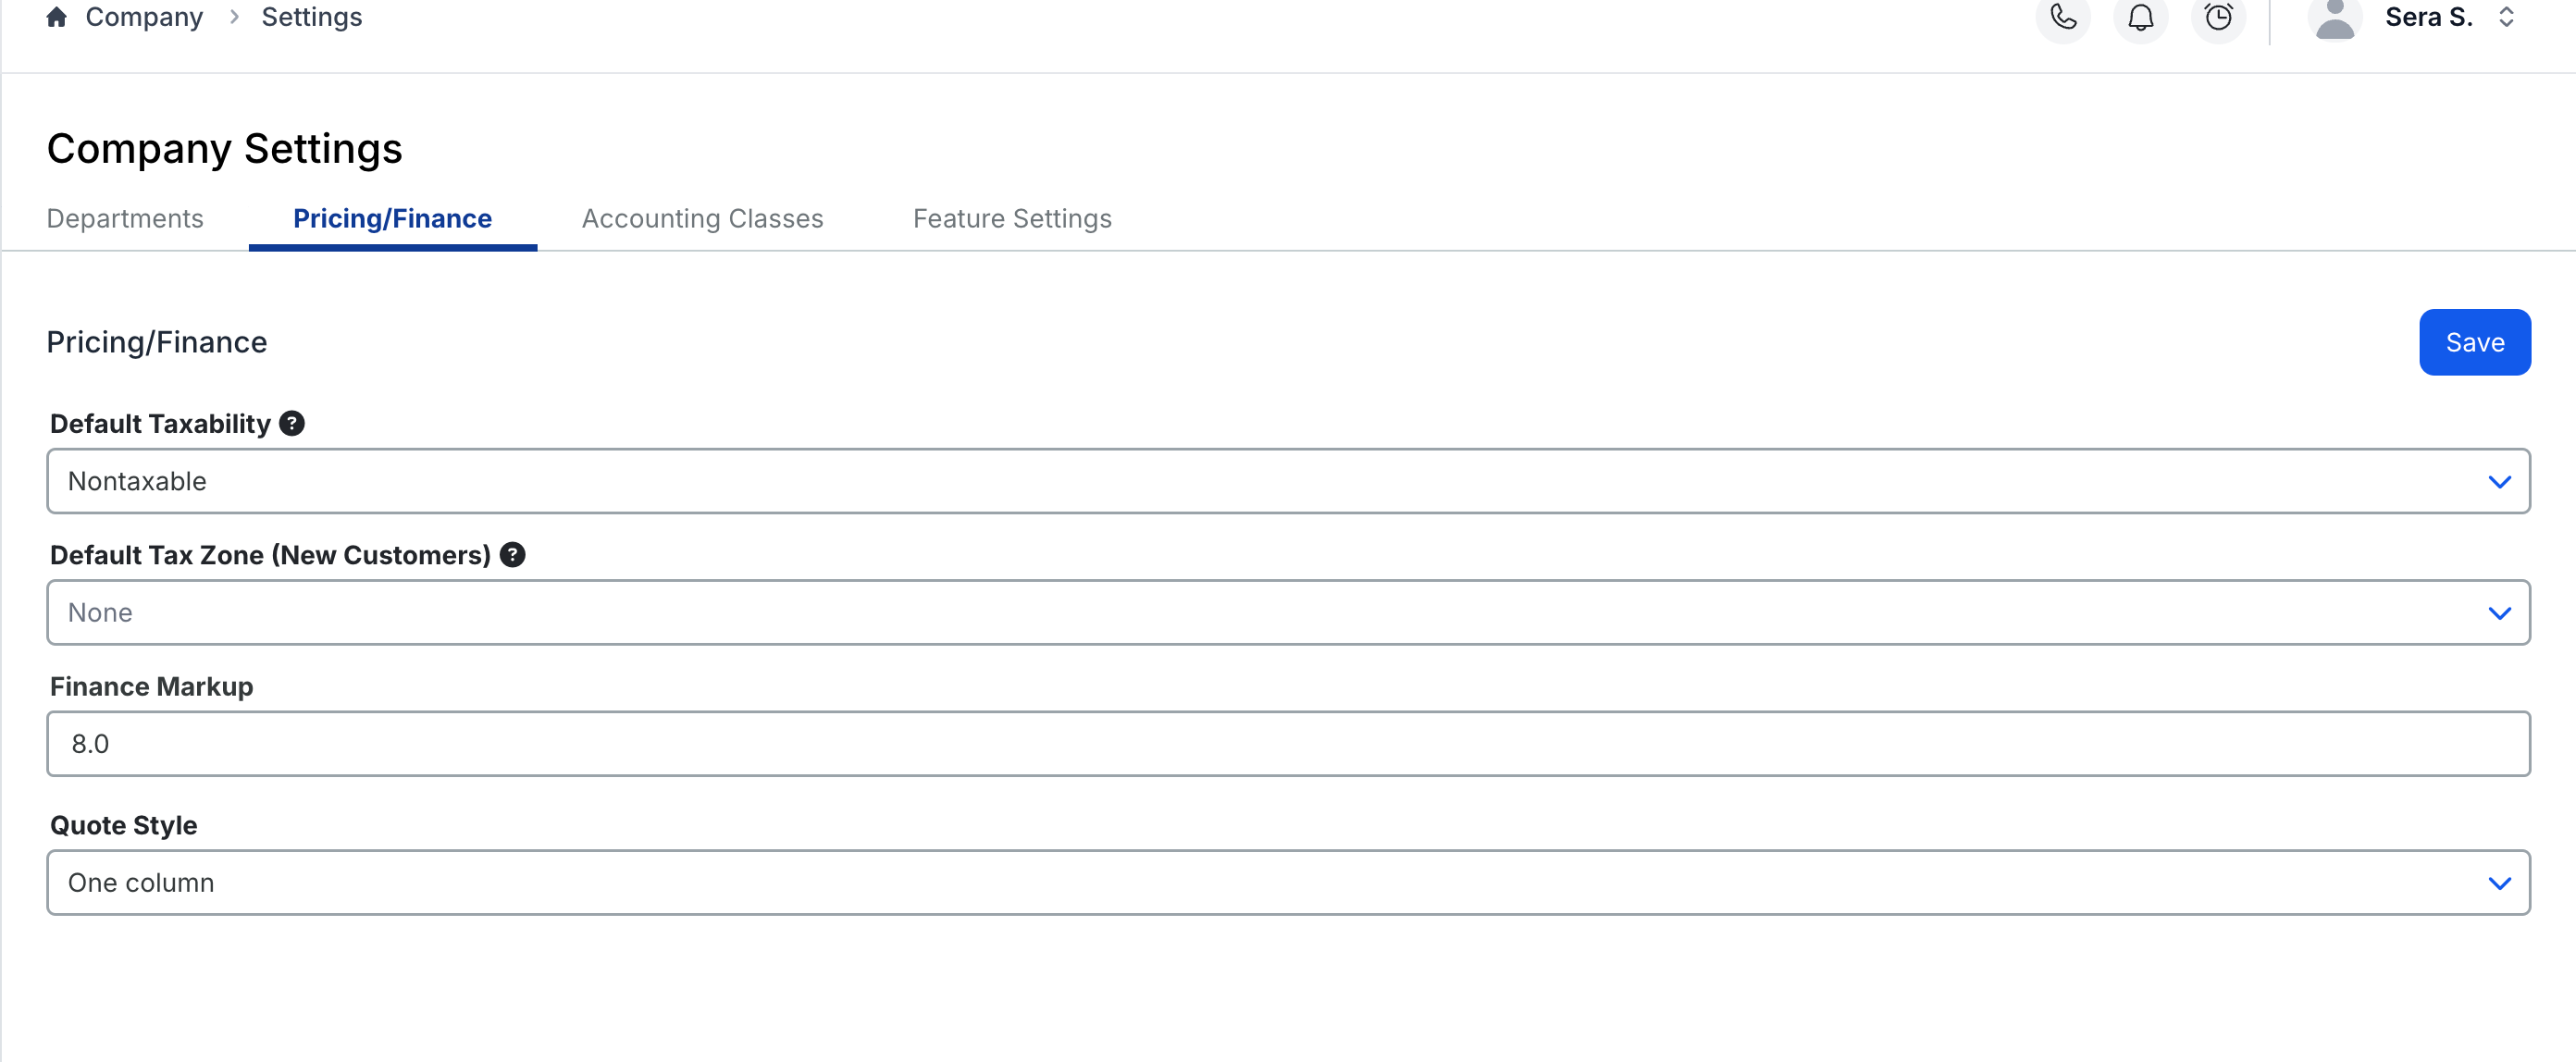
The Pricing/Finance tab manages your global pricing defaults and tax settings that apply across your entire account.
Tax Configuration
Setting default taxability:
- Taxable vs. Non-taxable: Choose your company's default tax status
- Tax Zone: Select a default zone or leave blank to set per customer
- Tip: Leave Tax Zone blank if you service multiple tax jurisdictions
For more information on taxing: How do I set up my tax rate in Sera?
Finance Markup
What it does: Covers incidental costs across all jobs
- Credit card processing fees
- Financing fees
- Other transaction costs
Typical range: 3-7% markup
- Applied automatically to all task pricing
- Helps turn cost centers into profit centers
Quote & Invoice Display
Choose your format:
- One Column: Standard pricing display
- Two Column: Enables membership comparison pricing
If using Two Column pricing:
- Ensure you have membership programs set up in Company → Programs
- Select your default membership program from the dropdown
- This program will appear as the comparison on all quotes/invoices unless changed
Accounting Settings
Overview
The Accounting Settings tab connects Sera to your QuickBooks account, ensuring proper revenue categorization and reporting through our batching process.
Accounting Categories (GL Codes)
What they are: These items are requested to assign revenue from your invoices that are processed in Sera to the appropriate areas in QuickBooks through our batching process.
Also known as:
- GL codes
- Accounts (within your Chart of Accounts)
- Product/Service names in QuickBooks
How Sera handles them by default:
- Sera automatically passes the Accounting Category as the Product/Service name during the batching process
- This simplifies the display and service tracking in QuickBooks on the invoice
- Streamlines the income reporting process
To add categories:
- Click + Add button
- Enter the category name (should match a Product/Service in QuickBooks)
- That Product/Service will be mapped to the appropriate Income account in QuickBooks
- Save
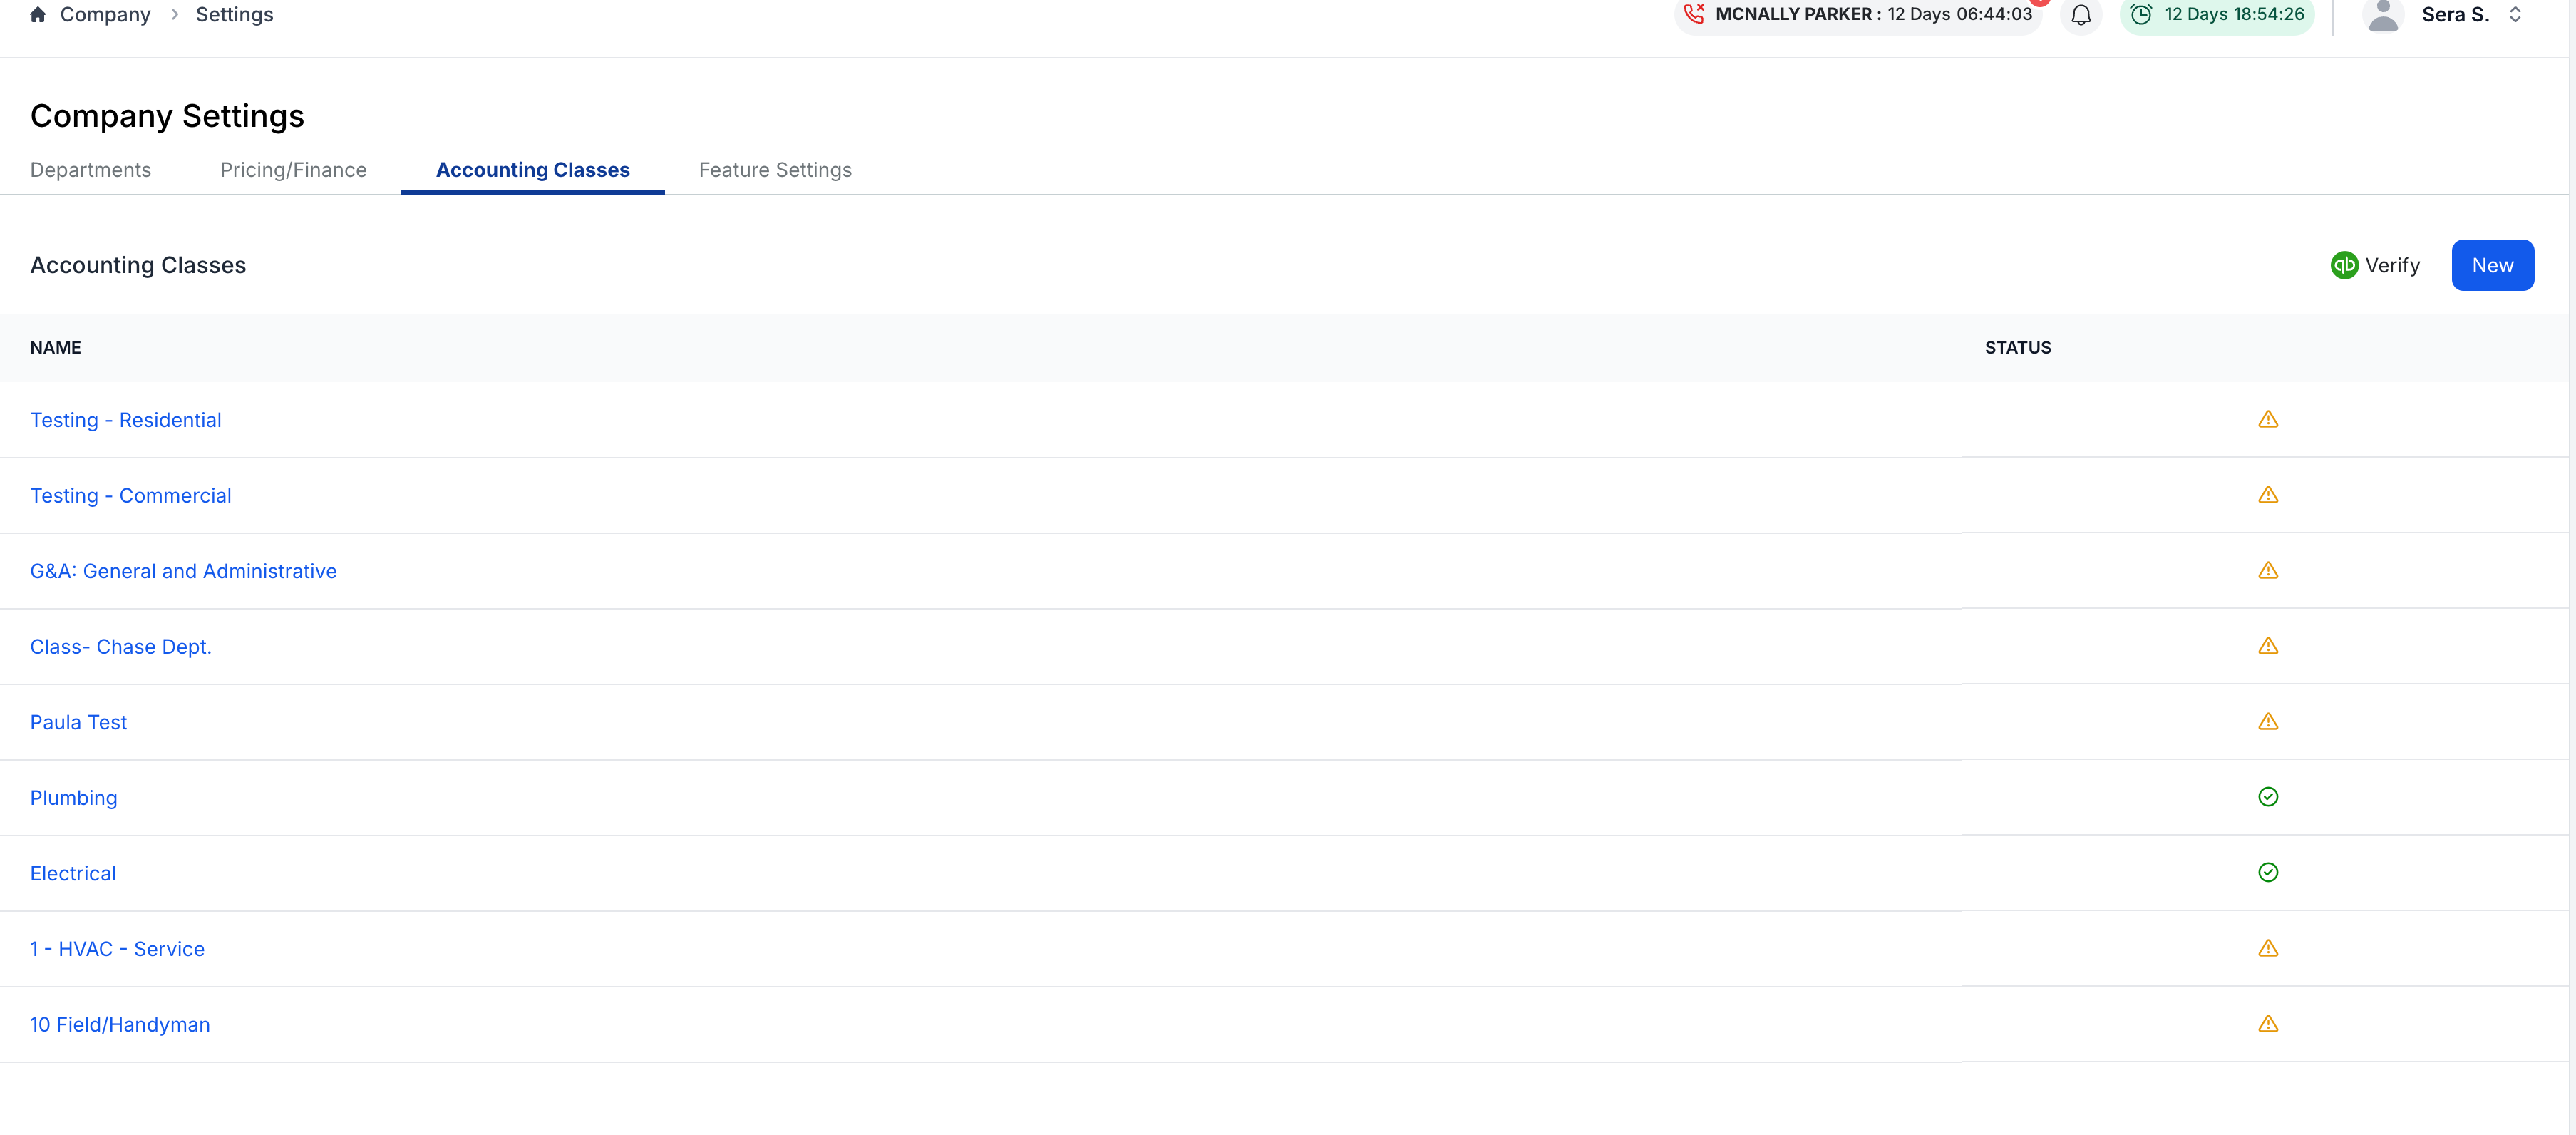
Accounting Classes
What they are: Optional categorization for department or location-based reporting in QuickBooks
Important requirements:
- Must match your QuickBooks Classes exactly
- Include all spaces and special characters
- Character-for-character match required for proper syncing
To add classes:
- Click + Add button
- Enter the class name exactly as it appears in QuickBooks
- Save
Tip for Categories and Classes: Both are requested to properly assign revenue from Sera invoices to the correct areas in QuickBooks through our batching process.
Feature Settings
Overview
The Feature Settings tab controls optional functionality that enhances your team's workflow.

Enable Appointment Pre-Work
What it does: Allows technicians to view job details before the customer is notified
Benefits:
- Technicians can prepare parts in advance
- Office can provide special instructions
- Reduces on-site delays
- Maintains read-only access until job starts
To enable:
- Toggle the Appointment Pre-Work switch to "On"
- Click Save
Common use cases:
- Jobs requiring special parts from warehouse
- Complex repairs needing preparation
- Multi-tech coordination
- Jobs with specific customer requirements
Click Learn More under each feature setting within the system to access additional articles and best practices.
Full-Day Schedule
How to Enable / Disable (Tenant + Technician)
What this controls
Full-Day Schedule toggles allow admins to control whether any, some, or none of their technicians can view all of their scheduled appointments and events for the day in the Tech App.
There are two levels of control:
-
Company (Tenant) Setting = turns the feature on/off for the whole company
-
Technician Preference = turns it on/off for a specific technician (only available when the company setting is ON)
1) Company (Tenant-Level) Toggle
Enable Full-Day Schedule for a company
-
Go to Company > Settings > Feature Settings
-
Find Full-Day Schedule
-
Toggle ON
What happens when Company Setting is ON
-
Full-Day Schedule becomes available to manage per technician
-
Technician-level toggles are enabled
-
Existing technicians default to enabled (unless changed per technician)

Disable Full-Day Schedule for a company
-
Go to Company > Settings > Feature Settings
-
Find Full-Day Schedule
-
Toggle OFF
What happens when Company Setting is OFF
-
Full-Day Schedule is disabled for all technicians
-
Technician-level toggle is not editable (greyed out)
-
Technicians will not be able to view the full-day schedule behavior in the Tech App

2) Technician-Level Toggle (Per Technician)
Note: This step is optional. Use the technician-level toggle only if you want to disable or re-enable Full-Day Schedule for individual technicians.
Disable Full-Day Schedule for a specific technician
-
Confirm Company > Settings > Full-Day Schedule is ON
-
Go to Dispatch > Technicians
-
Select a Technician to open the technician’s ‘profile’ page
-
Under Preferences, find Full-Day Schedule
-
Toggle OFF
Result:
-
That technician will not see the full-day schedule behavior in the Tech App.

Re-enable Full-Day Schedule for a specific technician
-
Confirm Company > Settings > Full-Day Schedule is ON
-
Go to Dispatch > Technicians
-
Select a Technician to open the technician’s ‘profile’ page
-
Under Preferences, find Full-Day Schedule
-
Toggle ON
Result:
-
That technician can view all scheduled appointments for the day in the Tech App.

What if the technician toggle is greyed out?
If the Full-Day Schedule toggle on the technician page is greyed out, the company setting is OFF.
-
Hover the tooltip to confirm: “Update this in Company Settings”
-
Go to Company > Settings > Feature Settings and turn Full-Day Schedule ON to enable technician-level control.


Viewing Technician Full-Day Schedule Status
Admins can quickly see which technicians have Full-Day Schedule enabled directly from the Technicians list.
-
Navigate to Dispatch > Technicians
-
View the new Preferences column in the list
What you’ll see
-
If Full-Day Schedule is enabled at the company level and enabled for a technician, you will see a “Full-Day Schedule” in the Preferences column.
-
If the preference is not enabled for a technician, nothing will appear.
Why this is helpful
-
This provides a quick at-a-glance view of which technicians can see their full day of scheduled appointments.
-
Admins can easily identify technicians who may need updates and click into their profile to make adjustments as needed.
