

Overview
First, what is GoHighLevel?
GoHighLevel (often shortened to GHL or "HighLevel") is a marketing and customer engagement platform. Think of it as sitting alongside Sera, not replacing it. Sera runs your operations — customers, jobs, appointments, invoices, memberships. GoHighLevel runs your marketing and follow-up — email campaigns, SMS drips, review requests, sales pipeline tracking.
Before this integration, if your marketing team wanted to send a text to every Customer with an active membership, they had to build the list by hand or maintain a Zapier pipe that copied Sera data into GoHighLevel. Now, that data flows over automatically.
In one paragraph:
The integration pushes your Sera customer data into GoHighLevel in real time. Customers, service addresses, memberships (with the technician who sold them), jobs (as opportunities in a sales pipeline), and appointment completions all flow across. Every Customer is automatically tagged with useful attributes so your marketing team can segment lists without asking you for reports.
The integration is one-way for this release. Data flows from Sera into GoHighLevel. Anything that starts in GoHighLevel does not flow back into Sera in this release.
The Integration Does the Following 6 Things:
- Your Customers become contacts in GoHighLevel. Add a customer in Sera, and within a few seconds they appear in GoHighLevel as a contact.
- Service addresses flow over as their own records. A Customer with three homes shows up with three linked service address records, not one confusing merged contact.
- Jobs become opportunities in a sales pipeline. Every Sera job you open flows over as a card in GoHighLevel's Opportunities view, and moves through Open, Won, and Lost as its status changes.
- Memberships come over with the technician's name. Sold as part of a quote, the technician who closed the sale rides along with the membership record.
- Appointment completions can trigger review requests automatically. The moment a technician marks an appointment complete in Sera, a signal fires into GoHighLevel. You can wire that signal to a review-request workflow and drop PulseM entirely.
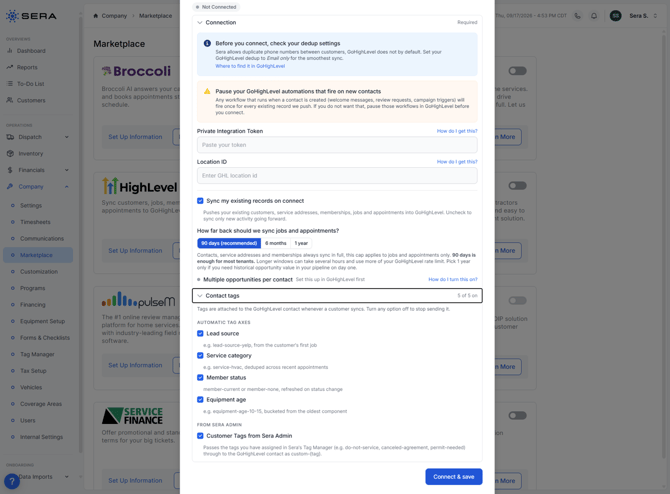
- Every Customer gets tagged automatically. Four attributes — lead source, service category, member status, and equipment age — attach to every contact so your marketing team can segment on them.
Video Overviews
👉Video: Sera-GHL Integration Setup
👉Video: Sera - GHL Integration (Syncing Data)
Before You Start
Two things to sort out in GoHighLevel before you connect the integration. Skipping either one causes noise on Day One.
-
Set your GoHighLevel de-dup to Email only
-
Sera allows two Customers to share a phone number (spouses, roommates, business contacts on the same landline). GoHighLevel's default treats matching phone numbers as duplicates and blocks the sync from creating a second contact. Setting dedup to Email only matches Sera's model and eliminates that friction.
-
Where to find it: in GoHighLevel, open Settings › Business Profile, scroll to Contact Deduplication Preferences. Set Find existing contacts based on to Email, and set Second preference for search to None.
-
-
-
Pause any GoHighLevel automations that fire on new contacts
-
The initial backfill creates a lot of contacts at once. If you have any workflows in GoHighLevel that fire when a new contact is created (welcome messages, review requests, campaign triggers), each one will run once for every existing record we push over. Usually not what you want.
-
Where to find them: in GoHighLevel, open Automation › Workflows. Look for anything with a Contact Created trigger. Turn them off before you connect. You can turn them back on once the initial backfill has finished.
-
-
What you'll need on hand
- Admin access to your GoHighLevel account
- Admin access to your Sera portal
- The Company section of your Sera portal, open in a browser tab
Let's Begin: Get your credentials from GoHighLevel
This part happens entirely in GoHighLevel. You are gathering two pieces of information you'll paste into Sera in Part 4: a Location ID and a Private Integration Token.
Step 1 — Log in and land on the Launchpad
Open a browser tab and go to https://app.gohighlevel.com/. If your account is on a whitelabeled URL, use that instead.
Sign in with your email and password. After sign-in you'll land on the Launchpad — a personalized setup guide for the account. This confirms login worked.
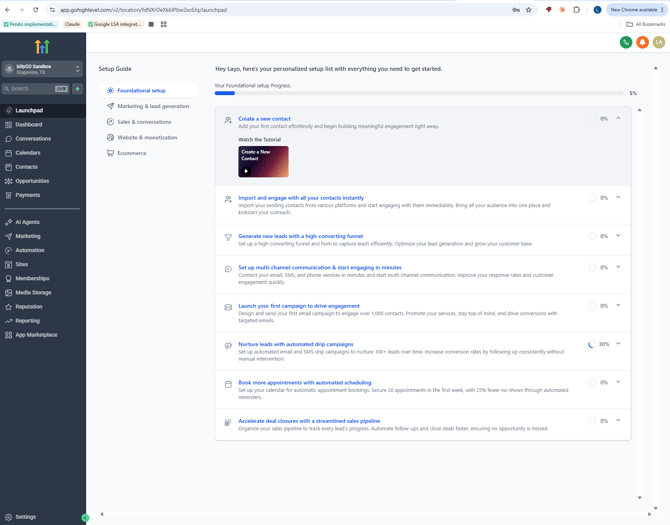
Keep this browser tab open. You'll stay in GoHighLevel for the next several steps.
Step 2 — Select the correct sub-account
If your login has access to more than one GoHighLevel sub-account, make sure you're in the one you actually want to connect. Everything you do here applies only to whichever sub-account is currently active.
Click the Account Selector in the top-left of the sidebar. It displays the currently-active sub-account's name and location. In the popout, choose the sub-account you want. The page will reload into that sub-account. Confirm the name in the top-left is correct.
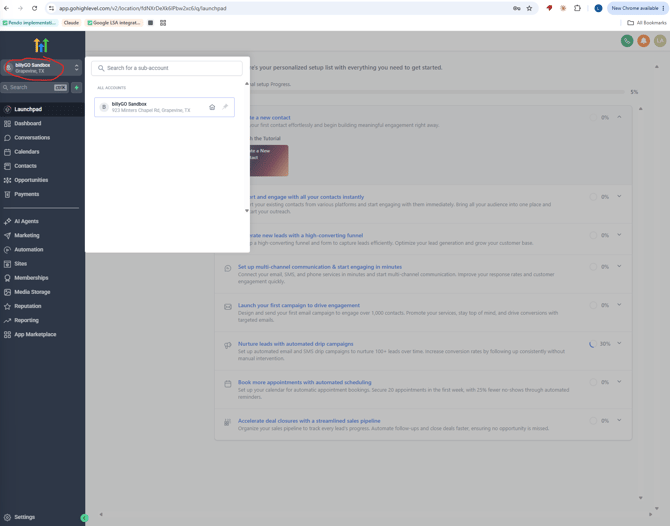
Account Selector dropdown in the top-left of the sidebar
If you only have one sub-account, this step is a "confirm you're in the right place" check.
Step 3 — Copy your Location ID
Sera needs your Location ID to know which GoHighLevel sub-account to talk to.
Look at your browser's URL bar. It will look like .../v2/location/fdNXrDeXk6lPbw2xc6Jq/launchpad. The string between /location/ and the next / is your Location ID. In the example, that's fdNXrDeXk6lPbw2xc6Jq. Copy it somewhere safe — a text file, password manager, or note app.
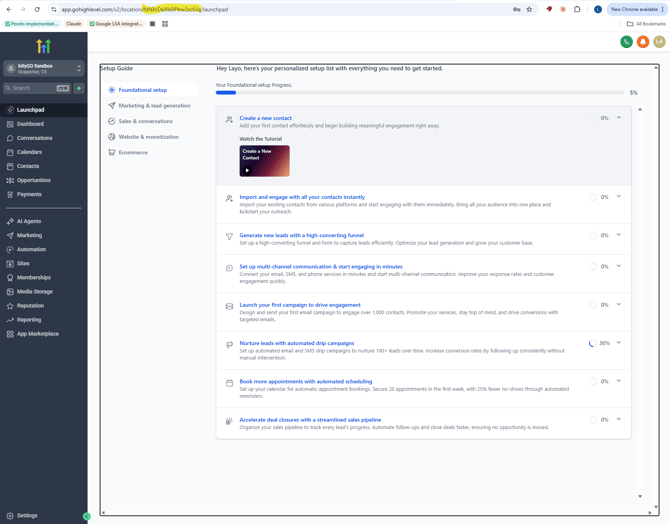
Location ID highlighted in the browser URL bar
Alternative: if the URL isn't visible or you'd rather find the Location ID in the UI, open Settings › Business Profile and it's displayed at the top of the page with a copy-to-clipboard button.
Step 4 — Open Settings
The rest of the setup happens inside the Settings area.
Click Settings at the bottom-left of the sidebar (under the gear icon).
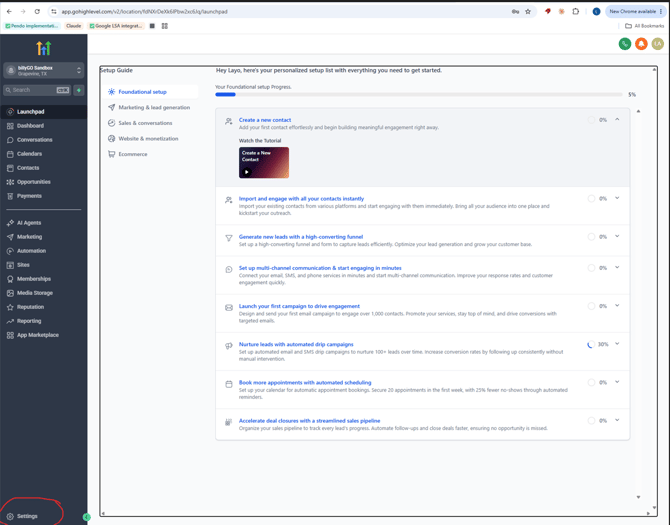
Step 5 — Generate a Private Integration Token
This token is what Sera will use to talk to your GoHighLevel account on your behalf.
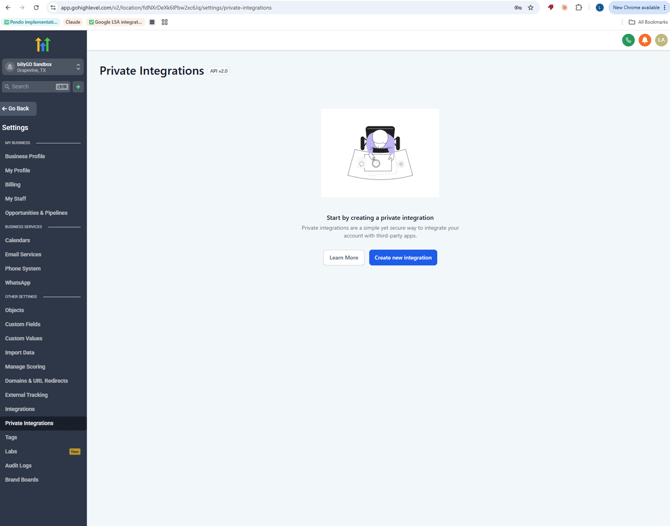
Step 5.1 — From the Settings sidebar, under Other Settings, click Private Integrations. If you haven't created any integrations before, you'll land on the empty state pictured below. Click Create new integration (the blue button in the center of the screen).
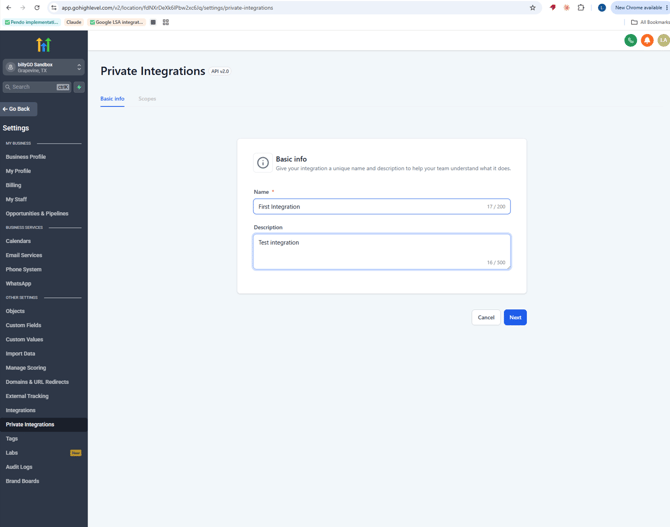
Step 5.2 — A dialog opens with two tabs at the top: Basic Info and Scopes.
On the Basic Info tab, enter a Name you'll recognize later, such as Sera Integration or Sera. Description is optional. Click Next to move to the Scopes tab.
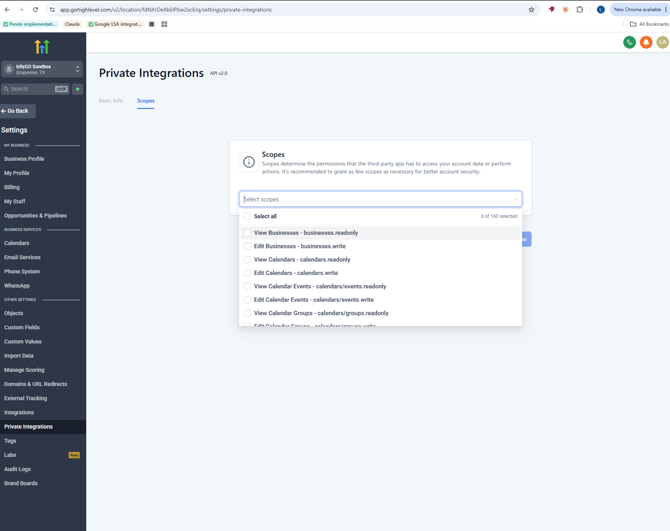
Step 5.3 — On the Scopes tab, click the Select scopes dropdown. It opens with a Select all checkbox at the top and a full list of scopes below.
Tick Select all to grant every scope. This is the recommended default while the integration is in beta. GoHighLevel's own on-screen guidance notes that granting fewer scopes is more secure — for production readiness Sera will publish a required-scopes list, and you can pare back later.
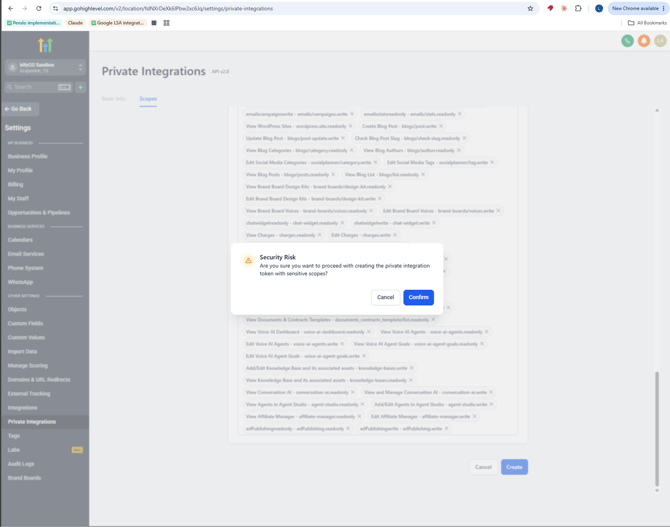
Step 5.4 — Click Create at the bottom right of the dialog.
Step 5.5 — GoHighLevel will show a Security Risk confirmation modal warning that you're about to create a token with sensitive scopes. Click Confirm to proceed.
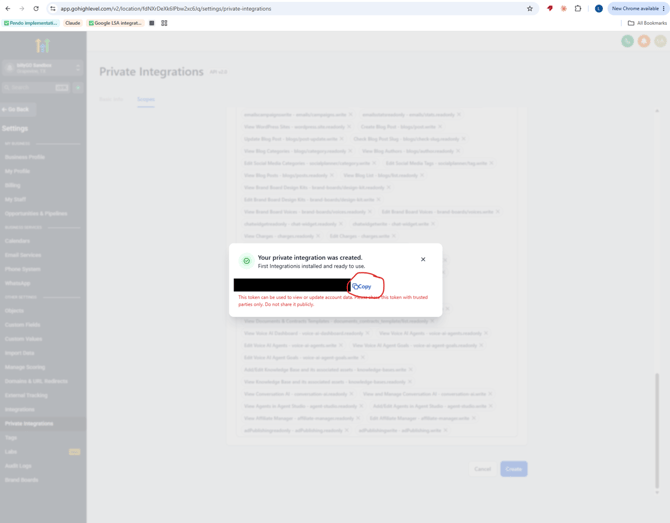
Step 5.6 — GoHighLevel then shows a success modal with the API key displayed below and a Copy button next to it.
Click Copy and immediately paste it into a safe place. Once you close this modal, the token cannot be retrieved again. If you lose it, you'll have to delete the integration and start over.
Step 5.7 — After you close the success modal, you'll land on the integration's detail page. It shows the token in masked form (e.g. pit-3a09****-****-****-****4bab) and two buttons: Rotate and expire this token now and Rotate and expire this token later.
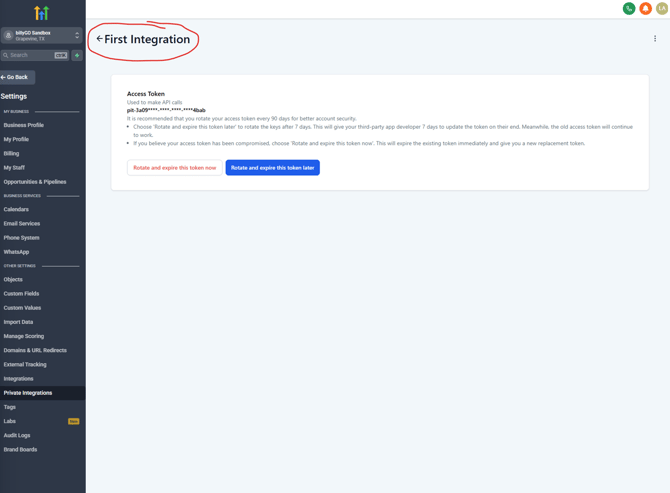
Do not click either rotation button during initial setup. Both are for replacing the token later. To leave this page, click the ← arrow next to the integration name.
Step 5.8 — You'll land back on the Private Integrations page, which now lists your new integration. This is your confirmation that GoHighLevel setup is complete.
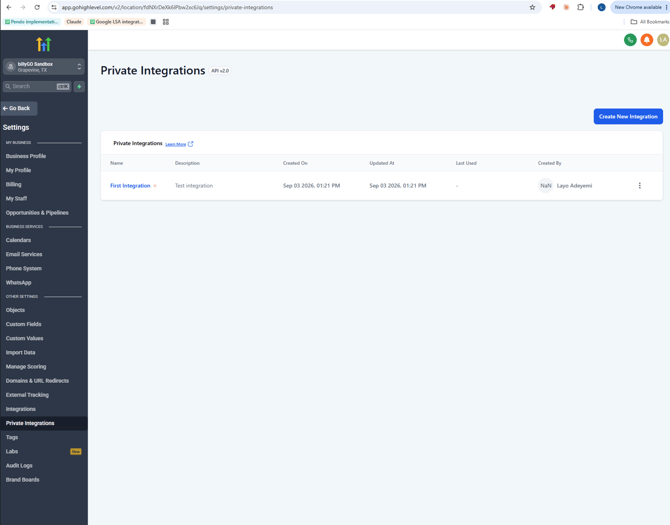
You should now have two things saved somewhere safe:
- Your Location ID (from Step 3)
- Your API key (from Step 5.6)
Connecting the Integration in Sera
Switch to your Sera admin portal for the rest.
Step 1 — Open the Marketplace
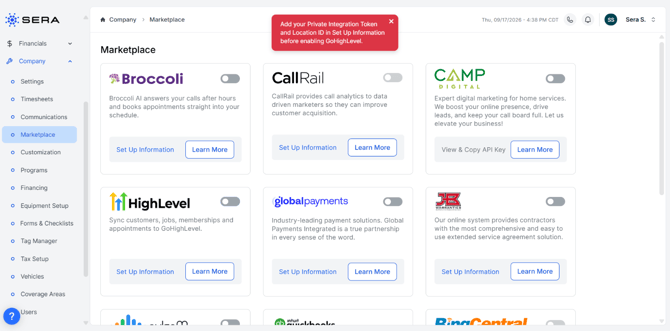
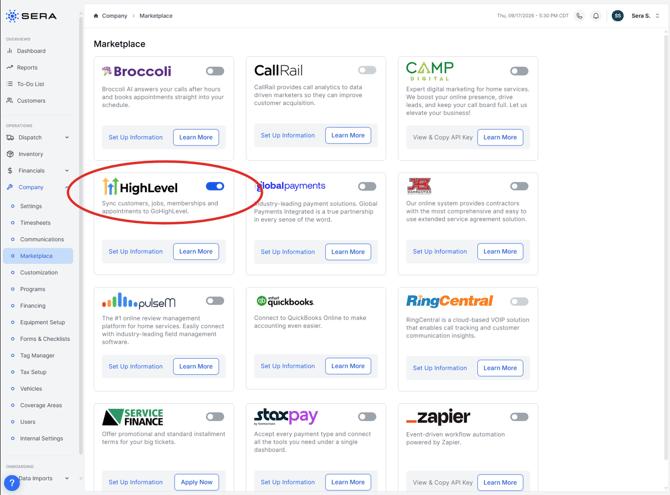
In your Sera portal, navigate to Company › Marketplace. You'll see a grid of integration cards. Find the HighLevel card. It should show a disabled toggle on the right and a Set Up Information button on the card.
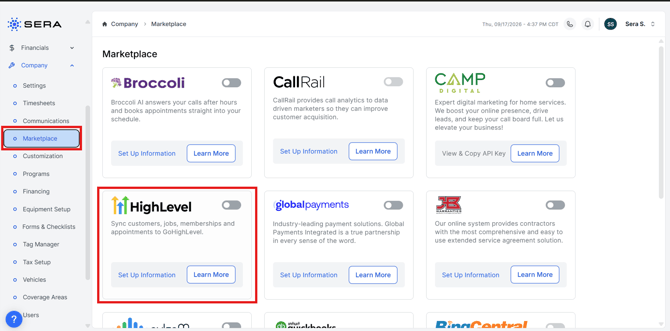
Step 2 — Try clicking the toggle before setup
If you try to switch the integration on before entering your credentials, Sera will bounce the toggle back and tell you why. This is a safeguard — the sync would fail immediately without a Location ID and Token to authenticate.
Step 3 — Open the setup modal
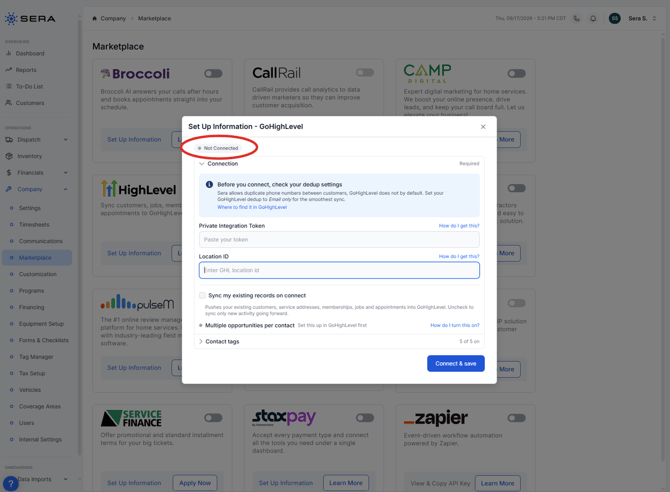
The Set Up Information modal opens. The connection status at the top reads Not connected. This is expected on your first visit.
Step 4 — Paste your Location ID and Private Integration Token
The first field is the Private Integration Token you generated in Part 3, Step 5.6. The second is the Location ID you copied in Part 3, Step 3.
Paste both in exactly as GoHighLevel produced them. Sera masks the token immediately once saved, so you won't see it in plain text again — that's expected.
Step 5 — Choose whether to sync existing records
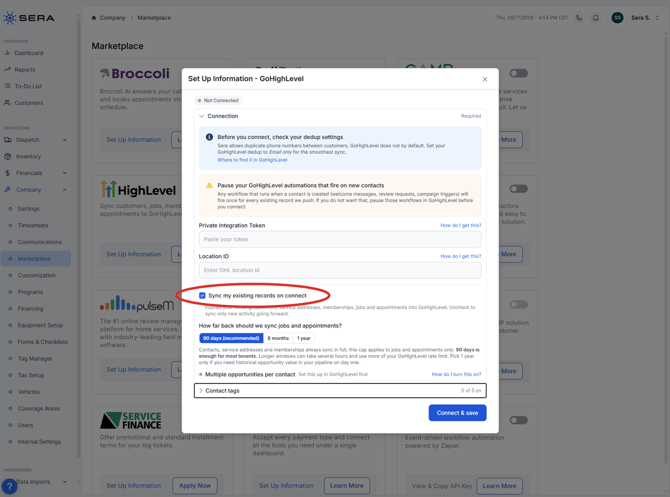
Under the credential fields you'll see a checkbox labeled Sync my existing records on connect.
- Leave it checked to backfill your existing Customers, service addresses, memberships, jobs, and appointments into GoHighLevel when the integration is turned on. This is what most Clients want. It runs in the background and takes anywhere from a few minutes to an hour depending on your data volume.
-
Uncheck it if you'd rather start clean and only sync new activity from this point forward. Nothing that exists in Sera today gets pushed to GoHighLevel. Everything created or updated after you connect will still flow across.
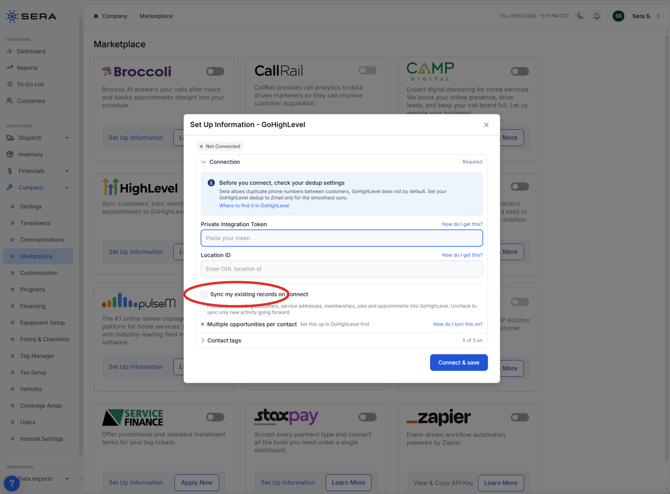
Important: If you leave the checkbox on, this is when the automation-pause reminder from Part 2 matters most. Any GoHighLevel workflow that fires on a new contact will run once for every existing Customer we push over.
Step 6 — Configure your Contact Tags
Sera automatically tags every synced Customer with four attributes so your marketing team can segment on them. All four are on by default. Toggle any of them off if you don't want that axis pushed.
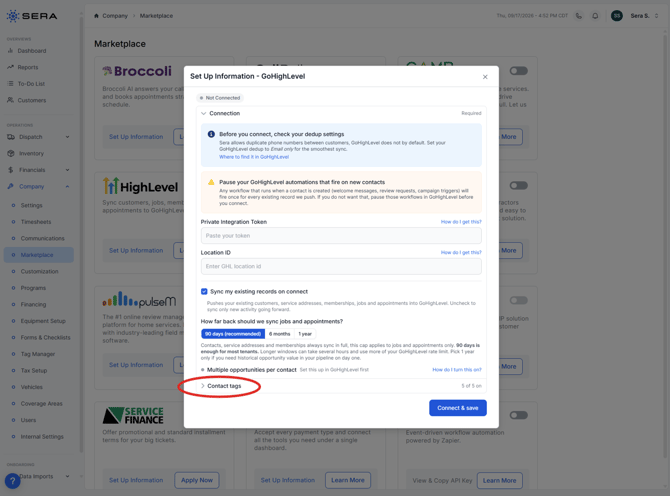
Click the accordion to see the individual axis descriptions:
Step 7 — Save and turn on the integration
Click Save to store your credentials and settings. Then flip the toggle in the top-right of the card to enable the integration.
If the "Sync my existing records" checkbox was on, the initial backfill starts immediately in the background. Continue to Part 5 to see what to expect.
What To Expect Once the Integration is Turned On
Once you flip the toggle on with the backfill checkbox enabled, Sera begins pushing your existing data into GoHighLevel in waves. The order is intentional — Contacts first, so associations can link to them, then service addresses, memberships, jobs, and appointments.
Watching the sync run
The modal shows a live progress panel while the backfill runs. Each of the five data types has its own progress bar.
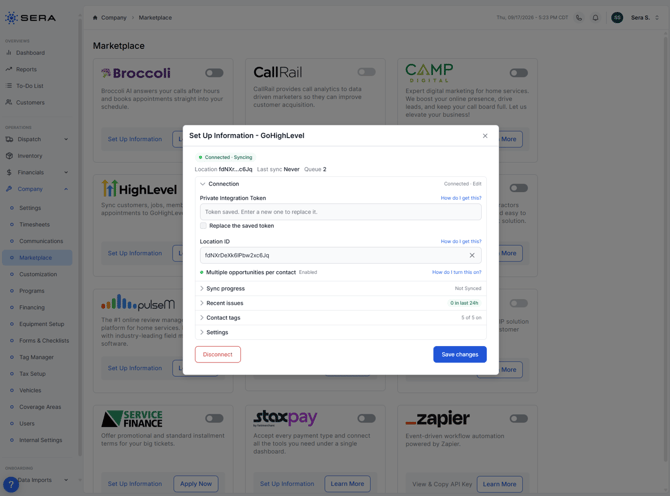
Syncing in progress, showing progress bars for each data type as the backfill runs
You don't need to sit here and watch it. You can close the modal, keep working in Sera, and check back later. New Customers, jobs, and appointments you create during the backfill still sync in real time — the backfill only refers to your existing data.
Monitoring your progress
If you want more detail on where the backfill is, click the progress panel to expand it. You'll see the total record counts per data type, how many have completed, and any records that were skipped.
When the sync finishes
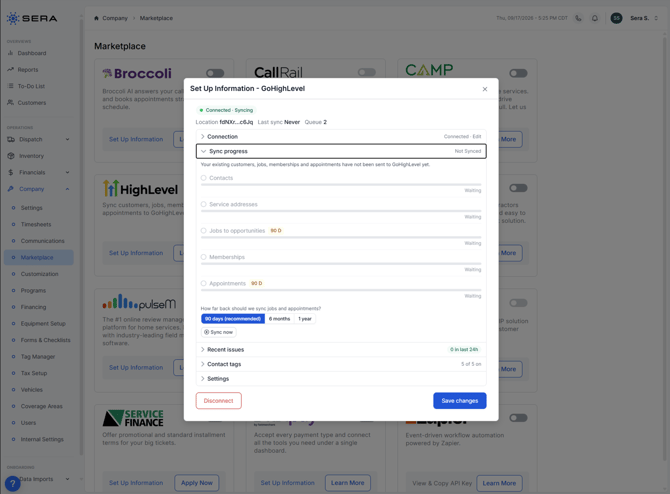
Once the backfill completes, the modal collapses to a summary view. The status pill at the top reads Connected, and the sync progress area is replaced by a "last sync" timestamp.
At this point, your GoHighLevel account has a full copy of your Sera data. Your marketing team can log in and start building lists.
Making the Data Useful in GoHighLevel
Once the initial sync finishes, your Sera data is inside GoHighLevel. Two views are worth spending five minutes on to make them genuinely useful for marketing and follow-up workflows.
The Contact page — where everything comes together
Open any Customer's contact in GoHighLevel and you'll see the full picture of what Sera has pushed across.
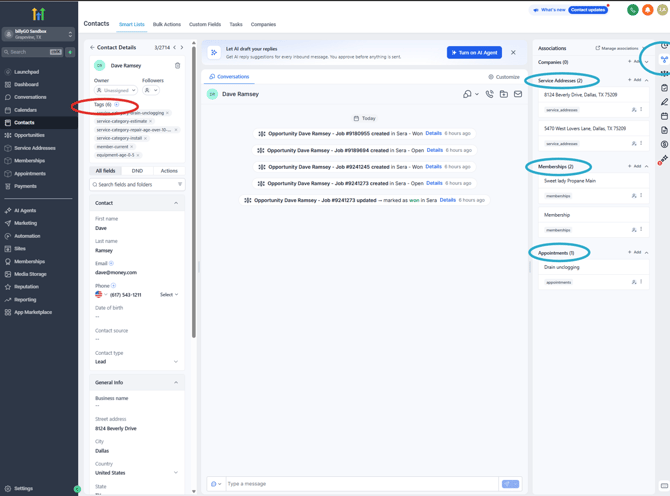
Contact detail page in GoHighLevel showing the primary contact info, the automatic tags panel, and the Associations tab expanded to show the linked service addresses, memberships, and appointments
Three things to notice on this page:
- Primary contact info at the top of the page — name, phone, email, primary address. These come from Sera's Customer record and stay in sync when you edit them there.
- Tags panel on the left rail — this is where the automatic tags land. You'll see the four axis tags (
lead-source-*,service-category-*,member-*,equipment-age-*) if all axes are on, plus any Sera admin Customer Tags flowing through ascustom-*tags. This is what your marketing team filters on when building segments. - Associations tab on the right rail — this is where the rest of the Sera data lives. Expand it to see the Customer's Service Addresses, Memberships, Jobs, and Appointments — all as linked records. You can click into any of them from here.
This is the workflow your marketing team will use most: open a contact, glance at their tags, click through to memberships or appointments for context, and then act.
Making the Memberships table more useful
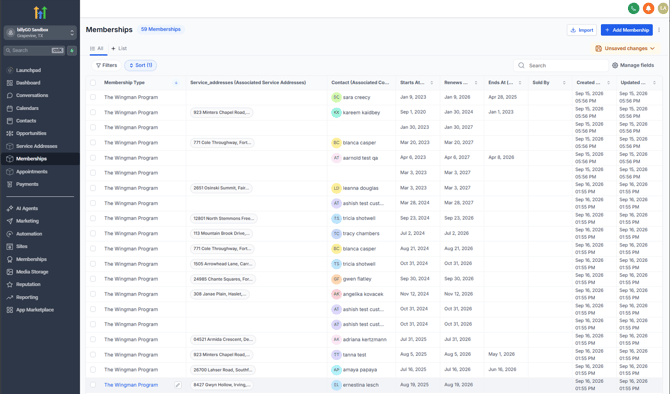
GoHighLevel's Memberships table is powerful for scanning and filtering, but the default view only shows membership-level fields. To make it useful for marketing follow-up, you'll add two columns: the Customer's name and the Service Address the membership is tied to.
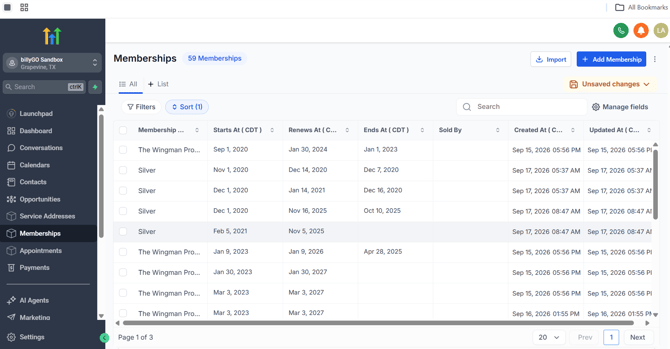
The default view
By default, the Memberships table looks like this — Membership Type, Starts At, Renews At, Ends At, Sold By, Created At, Updated At. Useful for scanning what memberships exist, but not enough context to know whose membership belongs to which address.
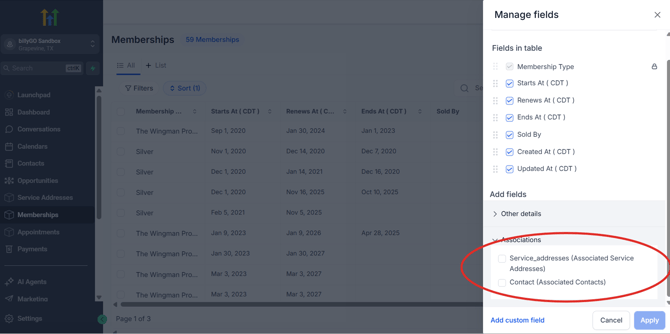
Adding Service Address and Customer columns
Click Manage fields in the top-right of the table. Add the Customer field and the Service Address field to your visible columns. Both fields are populated by Sera on every membership push, so they're always current.
The improved view
With those two columns added, the table becomes usable for real workflows. You can scan by Customer, filter by Service Address, and bulk-select rows to trigger automations or send messages to the underlying customers.
Common workflows this unlocks:
- Filter to all
Silver Legends Agreementmembers in a specific service area and send a bulk SMS about seasonal maintenance - Filter to memberships expiring in the next 30 days and trigger a renewal campaign
- Select a set of members with a specific technician as Sold By and send them a personalized message
What comes after Day 1?
After Day One, the integration keeps everything in step going forward. You don't have to do anything.
Contacts
New Customers in Sera become new contacts in GoHighLevel. Edits to a Customer's name, phone, email, or primary address flow over as updates. If you delete a Customer in Sera, the corresponding GoHighLevel contact is left in place — we don't automatically delete on the GoHighLevel side because tenants may have marketing history tied to it.
Service addresses
New service addresses on a Customer flow over as new records under that Customer's contact in GoHighLevel. You'll find them in GoHighLevel by opening the contact and clicking the Associations tab on the right side of the contact page.
Memberships
New memberships flow over as records associated with the Customer. Renewals and cancellations flow too — the record stays current with what Sera knows.
Note on the technician's name: there are two ways to assign a membership in Sera, and only one attaches the tech's name to the GoHighLevel record:
- Add Membership + directly on the customer or service address: the membership syncs, but there's no technician linked because you didn't go through a quote flow.
- Quote → Invoice → Approve → Dispatch to-do: the membership syncs with the technician's name filled in as Sold By.
Jobs → Opportunities
Every job in Sera flows over as an opportunity in a GoHighLevel sales pipeline. When a job's status changes in Sera (open → won, or open → lost), the opportunity moves with it. The opportunity carries the job's monetary value so your sales manager can see the pipeline's total value at a glance.
The opportunity is named {Customer Name} - Job #{id} so it's recognizable when scanning the pipeline.
Appointments and the review-request trigger
Every appointment flows over as its own record with the service category, technician's name, status, scheduled time, and completed time.
The most powerful piece is what happens the moment a technician marks an appointment complete in Sera. A signal fires into GoHighLevel that you can wire to any workflow you like. Most Clients wire it to a review request — a text or email that goes to the customer within 30 seconds of the tech finishing the job. This is what lets you drop PulseM entirely and centralize review collection in GoHighLevel.
Customer tags
The four tag axes described in Part 4, Step 6 are attached automatically to every Customer as their data syncs. The member-* tag auto-refreshes when a Customer's status changes. The others (lead-source-*, service-category-*, equipment-age-*) refresh whenever the Customer's contact is next synced for any other reason.
Checking On the Integration's Health
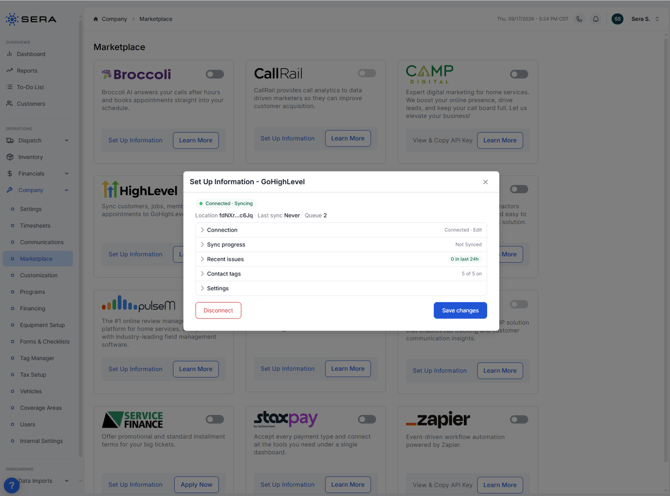
You can check on the integration's health any time by opening the Marketplace card. The collapsed view shows you everything at a glance: connection status, last sync time, outbound queue depth, and any recent sync issues.
What each field means
- Connection status pill — Green means the connection is healthy. Amber means the connection works but there are records that failed to sync. Red means the connection itself is broken (usually a token that's been rotated or revoked in GoHighLevel).
- Last sync — the timestamp of the most recent successful push.
- Outbound queue depth — how many records are currently lined up to push. Normally 0. A number here that stays high for more than a few minutes usually means GoHighLevel's rate limit is throttling the sync.
- Recent issues — a clustered list of records that didn't sync, grouped by reason (duplicate, missing email/phone, rate-limited, etc.).
When to expand the Recent Issues panel
If you see the amber pill, expand Recent Issues. The panel groups failures by their reason and shows the affected records inside each group.
Most issues fall into three categories:
- Duplicate contact — a matching contact already exists in GoHighLevel by phone or email, and GoHighLevel's dedup settings blocked the create. Usually resolves itself if you followed the dedup guidance in Part 2. If you didn't, revisit Part 2, Section 1 and change your dedup preference.
- Missing contact info — the Customer has neither an email address nor a phone number on file. GoHighLevel requires at least one. Update the Customer in Sera and the next sync will pick them up.
- Rate limited — GoHighLevel throttled us. The sync retries automatically. No action needed.
Troubleshooting
The toggle won't turn on
Sera blocks the toggle when the integration isn't fully configured. Open the setup modal (via Set Up Information), fill in the Private Integration Token and Location ID, save, and try the toggle again.
The sync appears stuck
Give it 5 to 10 minutes. Very large data volumes (10,000+ Customers or 100,000+ appointments) can take an hour or more. GoHighLevel rate-limits us to about 100 requests every 10 seconds per account, so the backfill throttles itself intentionally.
If it's been more than an hour with no progress, contact your Sera CX contact.
Everything looks fine in Sera but nothing's in GoHighLevel
Check that the toggle is actually on (top-right of the card, should be green/active). If it is, check the Outbound queue depth — if it's climbing steadily, records are being pushed. If it's 0 and no records are showing in GoHighLevel, contact your Sera CX contact.
I accidentally rotated the token in GoHighLevel
Generate a new one following Part 3, Step 5. Return to Part 4, open the setup modal, paste the new token in the Private Integration Token field, and save. The connection will re-authenticate automatically.
I need to disconnect the integration
In the setup modal, click Disconnect at the bottom-left. This stops all sync and clears the stored credentials from Sera. GoHighLevel keeps everything that was already pushed — the disconnect only affects future data flow.
I don't want a specific tag axis anymore
Open the setup modal, expand the Contact Tags accordion, and toggle the axis off. New syncs won't include that tag. Existing tags in GoHighLevel are not stripped automatically — you'd need to remove those manually in GoHighLevel if you want them gone.