What is Progress Billing?
Progress Billing (which your tenant may call Payment Schedule, Draw Schedule, or something else your office picked) lets a job's total be collected in multiple installments instead of one up-front payment. This set of articles covers everything a technician does with it on the mobile app.
For details on setting up Progress Billing and managing from the Admin Portal, please review this Knowledgebase Article: Admin Portal: Progress Billing
What You Can Do in the Mobile App
When does the Payment Schedule feature show up?
The Payment Schedule UI only appears when all of the following are true:
- Your tenant has Progress Billing turned on (the office controls this in Company Settings).
- The job currently being worked has Progress Billing enabled (the office controls this on each job).
- For the quote-presentation flow: there is at least one quote selected for acceptance and the resulting invoice is not yet finalized.
If the feature is off at the tenant level, none of the Payment Schedule UI appears anywhere in the tech app.
Terminology — how labels work
Two pieces of terminology are tenant-customizable. Wherever this documentation says Payment Schedule or Installment, your app may display a different word your office has configured.

For example, a tenant set up for construction draws might see "Configure Draw Schedule" and "Current Draw" in place of the defaults.
Permissions — what each role can do
Adding a Payment Schedule to a Quote
What this does
When a customer is reviewing quotes the tech presents, the tech can attach a Payment Schedule to the job so the resulting invoice is collected in installments rather than all at once.
This page covers the technician flow on the Quote Presentation screen.
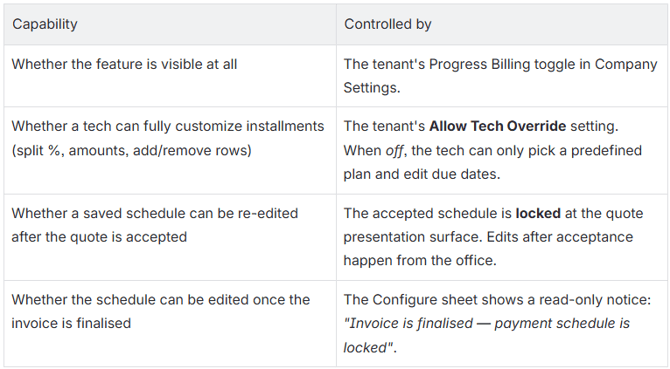
When the Payment Schedule row appears
A floating Payment Schedule row appears at the bottom of the Quote Presentation screen, just above the Accept Quotes bar, only when all of these are true:
- Progress Billing is enabled for the tenant.
- Progress Billing is enabled on the current job.
- There is at least one quote selected for acceptance.
- The invoice for the job is not already finalized.
- The selected quotes total is greater than $0.
If none of the eligible quotes are selected, or the invoice is already finalized, the row is hidden.
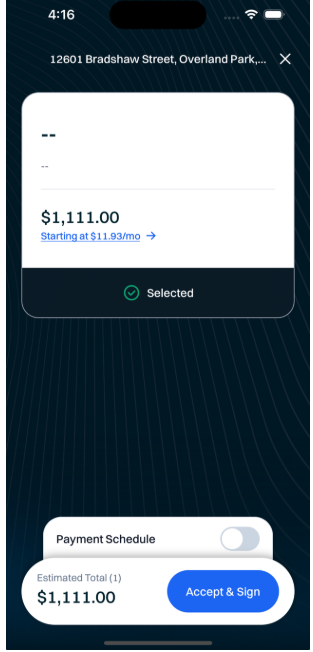
The Payment Schedule row
The row contains, left to right:
- The schedule label — your tenant's customized name (e.g., "Payment Schedule").
- A Switch that turns the schedule on or off.
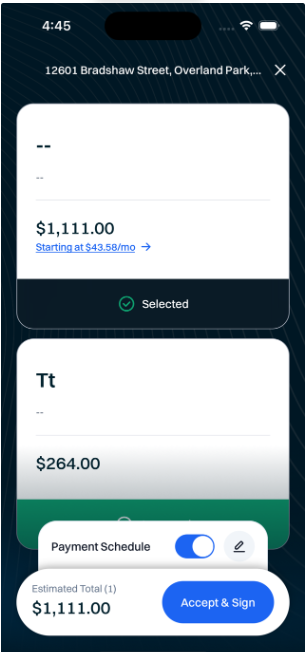
- After a draft is saved: an edit pencil button that reopens the Configure sheet.
Step-by-step — attaching a schedule
- Select the quotes the customer wants to accept (using the existing Quote Presentation flow).
- Tap the Payment Schedule switch to turn it on. The Configure Payment Schedule sheet slides up.
- (Optional) Pick a predefined plan from the horizontal chip picker — these are plans your office has set up.
- Set installments — switch between By % and By $ as needed, fill in labels, amounts, and due dates. See Configuring Installments for full detail.
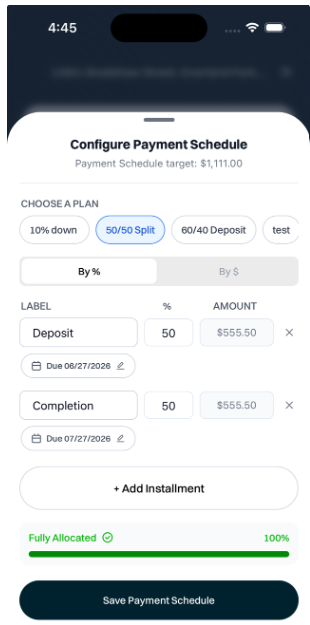
- The sheet header shows
Payment Schedule target: $X,XXX.XX— the running total of the selected quotes that the schedule must sum to. - Tap Save Payment Schedule at the bottom of the sheet. The sheet closes, and the row now shows an edit pencil instead of just the switch.
- Proceed with quote acceptance as normal. Once the customer accepts, the schedule is saved to the job and becomes the master schedule for the resulting invoice.
Editing a draft schedule before acceptance
After saving the draft, tap the pencil button on the Payment Schedule row to reopen the Configure sheet. The previously saved draft is reloaded — you can adjust amounts, due dates, swap plans, or change between % and $ mode.
Removing the draft
Toggle the Payment Schedule switch off. The draft is cleared; the next time the switch is toggled on, the sheet reopens with a fresh seed (the tenant's default plan, or evenly distributed installments).
Locking after acceptance
Once the customer accepts the quotes, the schedule is locked at the quote presentation surface. Re-opening the screen for a job whose schedule has already been accepted will not let the tech edit the schedule from the tech app. Edits to an active schedule are handled by office staff from the admin portal.
Why: the schedule is now driving real money — invoice totals, installment due dates, customer statements. Letting a tech freely edit it from the field would risk drift between what the customer signed and what the office bills.
Re-targeting when quotes are re-selected
The schedule target is sized against the currently selected quotes total, not against the saved invoice total. If the tech changes which quotes are checked, the target updates and the draft installments are re-allocated proportionally:
- In By % mode, the percent splits stay fixed and the dollar amounts recalculate.
- In By $ mode, the saved dollar amounts are preserved when the total matches; if the total changes, the last installment absorbs the difference.
If the dollar total no longer matches the new target, the sheet shows a "Plan needs review" orange notice prompting the tech to confirm amounts before saving.
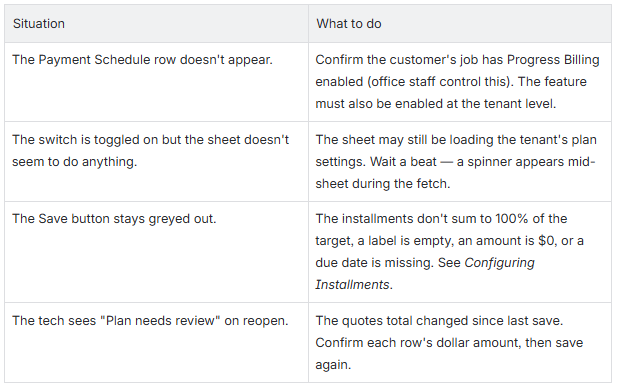
Common Situations
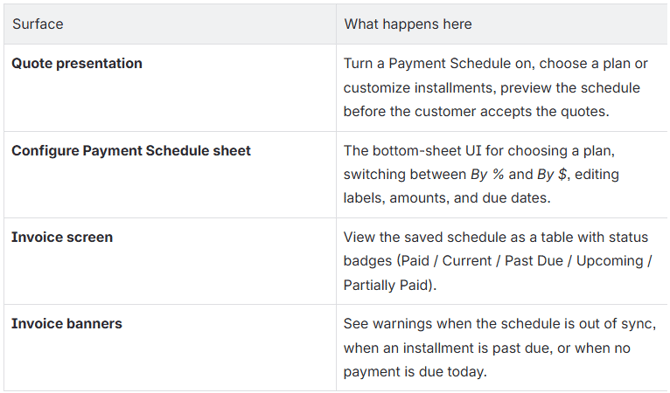
Configuring Installments - the Configure Payment Schedule Sheet
What this is
The Configure Payment Schedule sheet is the bottom-sheet UI where the tech sets up the individual installments that make up a schedule. It opens from the Payment Schedule row on the Quote Presentation screen, or — when permitted — from an invoice.
Sheet Anatomy
The sheet appears at 90% of the screen height. Top to bottom:
- Header —
Configure Payment Schedule(uses your tenant's label). - Subtitle
- On a quote draft:
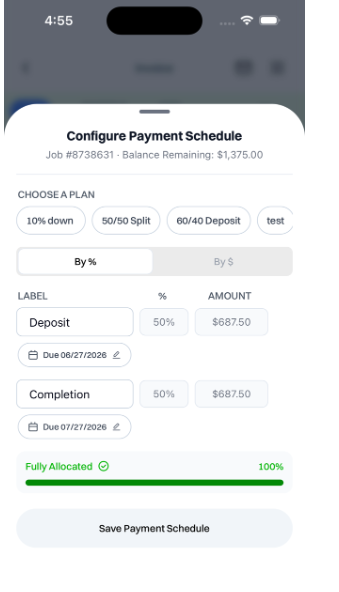
Payment Schedule target: $X,XXX.XX - On a live invoice:
Job #N · Balance Remaining: $X,XXX.XX
- On a quote draft:
- Plan picker — horizontal scroll of predefined plan chips (hidden when the schedule is locked to a master plan).
- Mode toggle — By % / By $ buttons.
- Column headers —
LABEL,%,AMOUNT. - Installment rows — one row per installment, editable.
- + Add Installment button (when permitted).
- Allocation summary card — running-total bar and status.
- Error / notice banners (conditional).
- Save Payment Schedule action button.
Plan Picker
If your tenant has defined plans (e.g., "50/50 Split", "Deposit + Final"), they appear as chips. Tapping one resets the rows to that plan's installments and pins the selection.
- The default plan (configured by the office) is pre-selected when the sheet is first opened on a fresh draft.
- If tech override is disallowed, the tech must pick a plan from this picker before Save will activate.
- If the schedule is already locked to a master plan (e.g., a per-quote schedule following the job's master plan), the picker is hidden — only due dates are editable.
By % vs By $ mode
The mode toggle decides what's editable per installment.
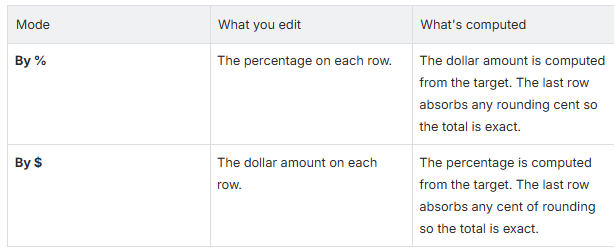
Switching modes re-derives the values, but the By % percentages are preserved across mode switches.

Installment Row
Each row has, left to right:
- Label — free-text (e.g., "Deposit", "Mid-job", "Final"). Cannot be empty.
- % field — percentage of the target. Editable in By % mode.
- AMOUNT field — dollars. Editable in By $ mode.
- Due date — tap to open a calendar. The first row defaults to today; subsequent rows are seeded (today + tenant default net days) apart, falling back to 30 days when the tenant hasn't set a default.
- Delete (trash icon) — only shown when there is more than one row and the tech has permission to remove rows.
A row whose due date is required but missing turns orange to mark it for the tech to fix.
Locked-customization mode
When tech override is off at the tenant level, the row fields (label, %, $, delete) are locked grey. The tech can still set or change the due date on each row. The picker is the tech's primary edit lever in this mode.
Plan-locked mode (per-quote schedule following a master)
When the schedule must follow the job's master plan, the split (labels, %, $) is fixed and only due dates are editable. The picker is hidden in this mode.
Allocation summary card
The card at the bottom of the editable area shows the current allocation against the target.
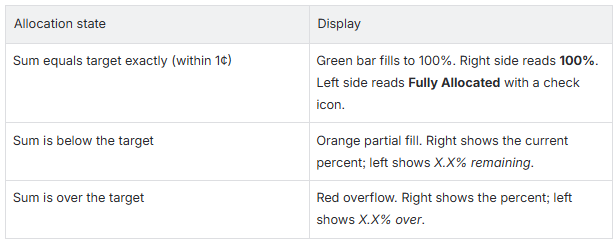
A hint below the bar reads "Must equal 100% to save" until allocation is exact.
If any due-date errors are present, an additional hint reads "Add a due date to each highlighted installment to save".
Save rules — when the button activates
The Save button activates only when all of the following are true:
- The installments are fully allocated (sum equals 100% / target within 1¢).
- Every row has a non-empty label.
- Every row has a non-zero amount (or non-zero % in % mode).
- If tech override is off and the schedule isn't already plan-locked, a predefined plan is selected.
- The plan config has loaded successfully (no fetch error).
Due-date errors don't gate the button — instead, tapping Save with a missing due date shows the error inline against the offending row so the tech can fix it without hunting for a hidden disabled-button reason.
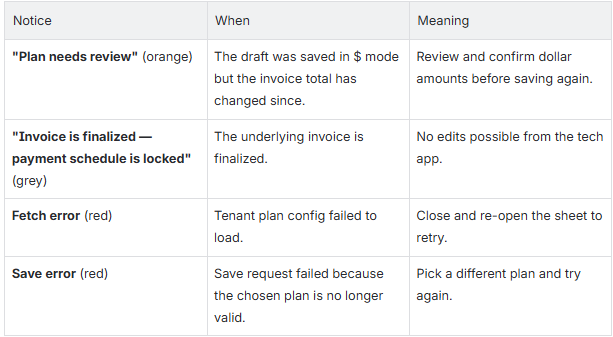
Notices the sheet can show
Saving
Tapping Save Payment Schedule persists the draft. On the quote-presentation surface, this stashes the draft in memory until quote acceptance. On the invoice surface, this submits the schedule to the office immediately.
After save, the sheet closes and the parent surface updates — the Payment Schedule row shows an edit pencil, or the invoice shows the schedule table.
Viewing the Payment Schedule on an Invoice
What this is
Once a customer has accepted quotes with a Payment Schedule attached (or the office has added a schedule to an existing job), the schedule appears on the Invoice screen in the tech app. The technician sees this when collecting payment or reviewing the job's billing status.
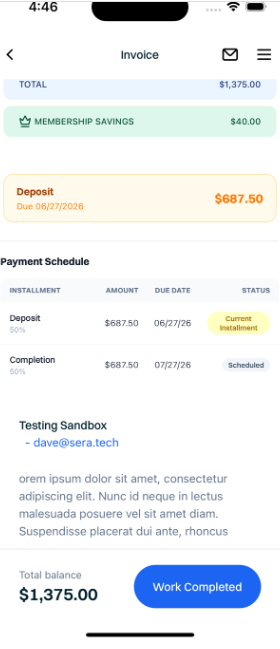
Where it appears
On any invoice for a job with Progress Billing enabled, a section labelled Payment Schedule (or your tenant's customized term) is rendered below the line-items section and above the totals. It contains:
- A section header — the schedule label.
- A table of installments — one row per installment.
- Any of three contextual banners (out-of-sync, past-due, upcoming). See Payment Schedule Banners & Warnings.
The schedule table
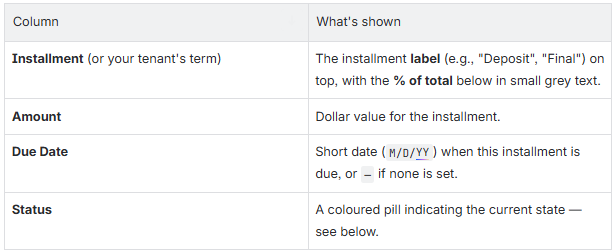
Rows are sorted by their saved position (typically first to last in time).
Status Pills
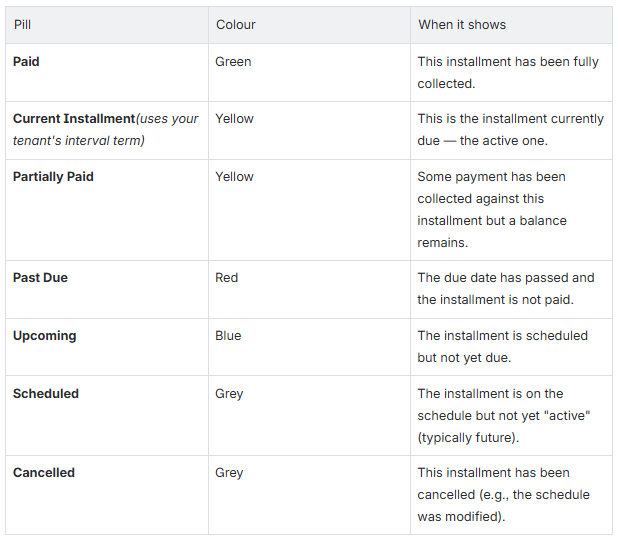
The exact wording of Current Installment picks up the tenant interval term — for a construction tenant using "Draw" as the interval, this pill reads "Current Draw".
How to read the table
Two quick reads the tech should be able to do at a glance:
- Is there a Past Due row? If yes, there is unpaid money on a prior installment. The Past Due banner above will also call this out.
- Where is the Current row? This is the installment to collect against today (assuming today is on or after its due date).
If there is no Current or Past Due row, no payment is due right now — the next Upcoming row tells the tech when the next one will come due.
What the tech app does not let you do from this view
The schedule table is read-only on the invoice screen for the tech app. Edits to amounts, labels, or due dates after the schedule is accepted happen in the admin portal. The Configure Payment Schedule sheet may still be reachable on an active invoice in some cases, but it shows a read-only locked state if the invoice is finalized.
Payment Schedule Banners and Warnings
What this is
On the Invoice screen, three contextual banners can appear above (or in front of) the Payment Schedule. Each conveys a specific state the tech needs to act on — or not act on — before collecting payment.
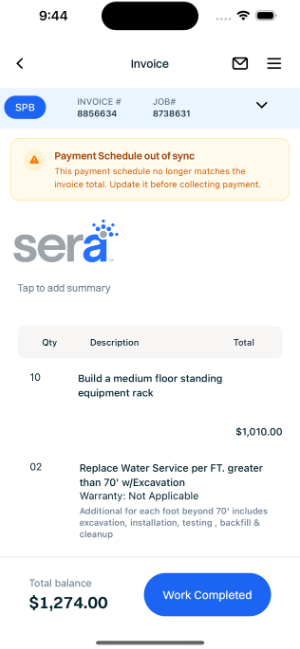
1. Out-of-Sync warning — orange

(The exact wording substitutes your tenant's Payment Schedule label.)
When it appears: The invoice total has drifted from the sum of the schedule's installments. This commonly happens when the office adjusts line items after the schedule was accepted, or when a quote is added/removed from the job after the schedule was set.
What the tech should do: Don't collect payment against the schedule yet. Contact the office — they'll either regenerate the schedule or confirm what the new totals should be. Once the schedule is updated to match the invoice total, this banner clears on its own.
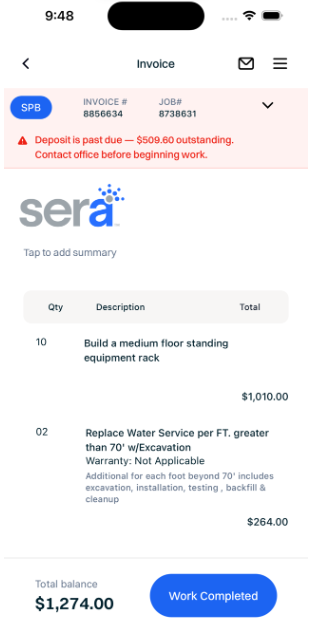
2. Past-Due alert — red

When it appears: The currently active installment has a balance due and should contact the office before starting any new work. The customer is behind on an agreed payment for this job, and the office may want to handle collection or hold the job until it's resolved.
The amount shown is the outstanding balance of the active installment, not necessarily the full invoice balance.
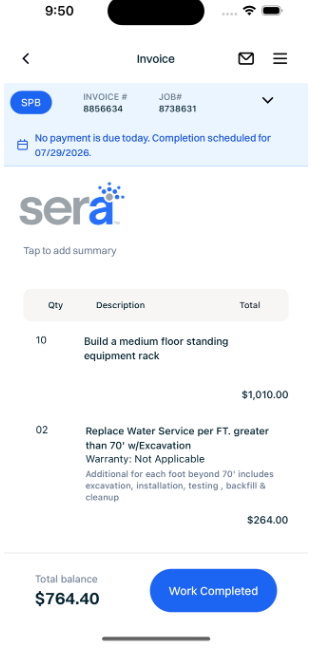
3. Upcoming / No-payment-due-today banner — blue

When it appears: The current state of the schedule is "upcoming" — everything that was due has been paid, and the next installment isn't due yet.
What this tells the tech: Don't try to collect a payment against the schedule today; the customer doesn't owe anything until the next installment date. Proceed with the work as planned.
Banner stacking and ordering
The banners are mutually exclusive in terms of the schedule's primary state:
- The out-of-sync banner is shown independently above the Payment Schedule table whenever drift is detected (it can stack with any of the other state banners).
- Exactly one of Past Due, Upcoming, or (none) is shown for the schedule's active state.
If all installments are paid, no Past-Due or Upcoming banner appears.
What if no banner appears at all?
The schedule is in a "current" state — there is an installment due today or earlier that is not yet past due. This is the normal case for a tech collecting payment: tap into the payment flow to collect against the Current installment.