What Progress Billing Does
Instead of sending one big invoice and waiting for it to get paid, Progress Billing lets you bill a job in stages — for example, 50% as a deposit and 50% at completion. Sera tracks which stage your customer is on, sends reminders when a payment is due, and shows you a clear picture of what's still outstanding.
This article walks you through the one-time setup that turns Progress Billing on for your whole business.
Step 1 — Turn the program on
Go to Company › Settings › Progress Billing. Flip the Enable Progress Billing toggle to on.
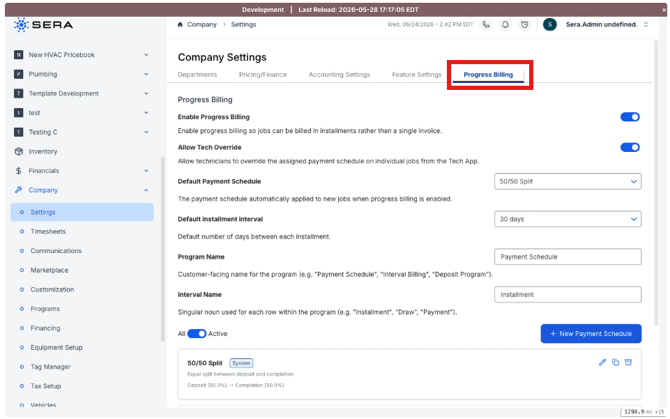
Until this is on, nothing about Progress Billing appears anywhere in your account — no new buttons on jobs, no extra columns on reports, no email reminders.
Step 2 — Decide if technicians can adjust plans
Below the main toggle, you'll see Allow Tech Override. Two choices:
- On (recommended for most businesses): Technicians can adjust the plan on a job from the Tech App — handy if the customer wants 60/40 instead of your default 50/50.
- Off: Only office admins can build plans. The Tech App shows the plan, but the technician can't change it.
Step 3 — Pick a default plan OR build a custom plan
Choose a Default Payment Schedule. This is the plan that automatically attaches to new jobs so the office never forgets to add one.
Three plans ship with Sera out of the box. Pick the one closest to how you typically bill:
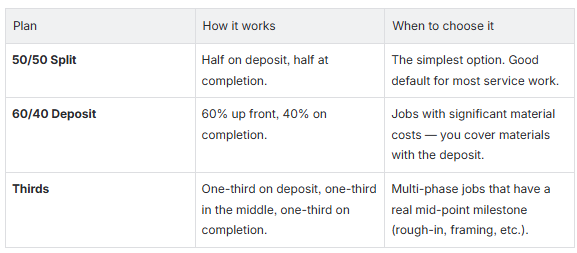
You can also click + New Payment Schedule to build your own plan.
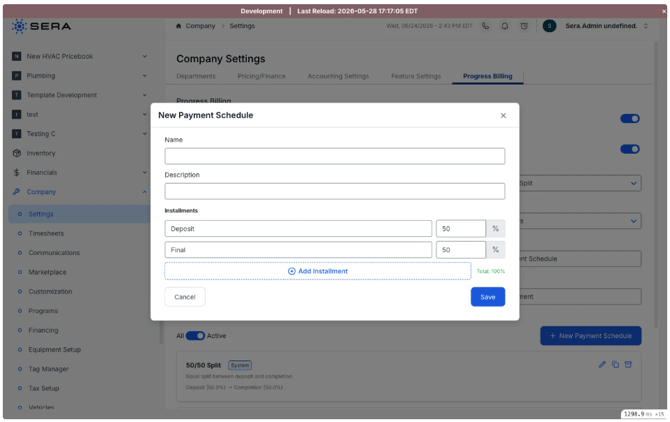
Give the plan a name (this is what your team picks from the list when creating a job), an optional description, and 2 to 12 stages. Each stage needs a label your customer will recognize (Deposit, Rough-in, Final) and a percentage. The percentages have to add up to 100% — Sera won't let you save otherwise.
Step 4 — Set the default time between payments
Pick a Default installment interval — usually 30 days. This is how far apart each stage's due date is, if you don't enter specific dates when creating a plan.
Step 5 — Name the program and stages
Sera uses Payment Schedule for the program and Installment for each stage by default. If your office talks differently, change them:
- Program Name — what customers see on invoices and emails. Common renames: Progress Billing, Interval Billing, Deposit Program.
- Interval Name — the word for one stage. Common renames: Draw, Payment, Milestone.
Whatever you pick rolls out everywhere immediately — invoices, emails, the customer portal, even the QuickBooks memo. Past emails aren't rewritten, but every new one uses the updated wording.
Step 6 — Pick which departments use Progress Billing
Go to Company › Settings › Departments. For each department that should use Progress Billing, click into it and turn on its Progress Billing toggle.
This lets you roll the program out gradually — for example, "HVAC Install yes, Service Repair no" — without having to retrain every technician at once.
Step 7 (optional) — Opt specific technicians in or out
If a particular technician shouldn't see Progress Billing in the Tech App, edit their user profile and turn off the Progress Billing preference. By default, every technician in an enabled department sees it.
What happens next
From here, the next time someone creates a job in a Progress-Billing-enabled department, Sera attaches your default plan automatically. The technician or admin can adjust it before the invoice is finalized, then collect the deposit on-site like any other payment.
Common questions
-
"We use the word 'Draw' instead of 'Installment.'" Change the Interval Name field in Settings. Everyone — customers, technicians, the report headers — will see the new word starting immediately.
-
"What happens to existing customers' plans if I turn off Progress Billing later?" Plans already in flight keep working — payments still cascade, draws still advance. You just can't create new plans until you turn it back on.
-
"Can we have different default plans per department?" Not yet — the default is set at the business level. You can override it on any individual job, though.
-
"How many stages can a plan have?" Between 2 and 12. Anything outside that range and the math gets unfriendly.
-
"What if my customer wants a deposit in a specific dollar amount, not a percentage?" You can switch any plan into By Amount mode when you create it on a job (covered in the next article).
Creating a Payment Schedule for a Job
What this does
A payment schedule turns one big invoice into a set of smaller scheduled payments. The customer agrees to the schedule up front, the deposit gets collected on-site, and Sera tracks the rest automatically.
Before you start
- Progress Billing is turned on for your business (see Setting up Progress Billing for your business).
- The job's department has Progress Billing enabled.
- You have a quote / invoice total to size the plan against.
- You know what split the customer agreed to (or you're using the default).
Open the modal
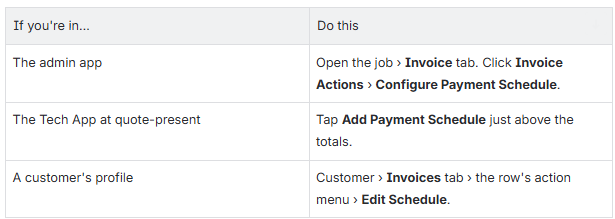
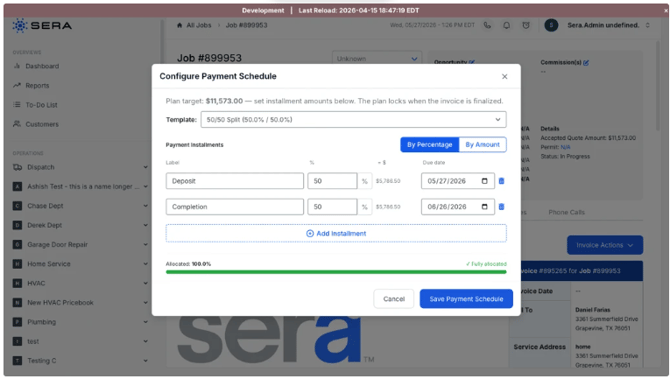
1. Confirm the plan target
At the top of the modal, you'll see a Plan target — the total dollars the schedule is sized against. By default, this is the invoice's current balance. Sera locks this in when you save, so if the invoice changes later, the plan target stays put (and Sera will warn you).
2. Pick a template
Use the Template dropdown to pre-fill the schedule. You'll see the built-in plans (50/50 Split, 60/40 Deposit, Thirds) plus any custom plans your office built in Settings. Pick whichever matches what your customer agreed to.
If none of them are quite right, pick None and build the stages by hand.
3. Choose percentages or dollar amounts
Toggle By Percentage / By Amount at the top right of the installment grid.
4. Adjust labels and amounts
Each row has a label (Deposit, Rough-in, Final, etc.) and either a percentage or a dollar amount. Change anything that doesn't match the conversation you just had with the customer. Add a row with + Add Installment if you need more stages, or remove one with the trash icon.
5. (Optional) Set due dates
Each row has a due date field. Set them if you've agreed on specific dates with the customer — these drive the email reminders. The dates have to go in order (each one on or after the previous), and they have to be today or later.
If you leave them blank, Sera uses your Default installment interval setting (usually 30 days apart from the invoice date).
6. Confirm "Fully allocated"
Watch the green progress bar at the bottom of the modal. When the percentages or amounts add up to the target, it reads 100% / Fully allocated and the Save button enables. If the bar is yellow or red, your rows don't add up — fix them before you can save.
7. Save
Click Save Payment Schedule. The plan attaches to the invoice and shows up on the Invoice tab as a Payment Schedule table.
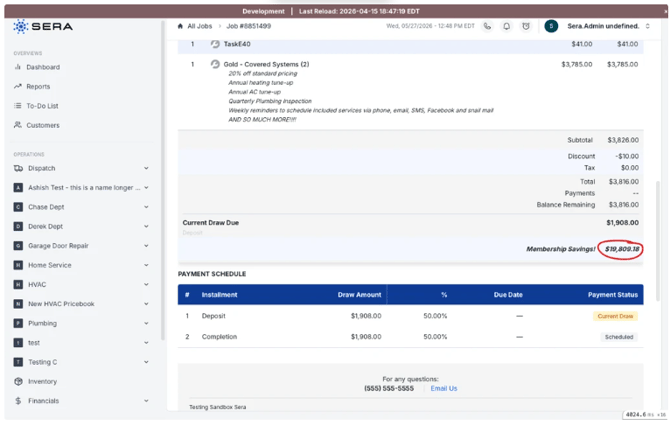
After the plan is saved
- The first row becomes the current draw — that's what the office (or you, on-site) will collect next.
- Other rows stay in Scheduled state until their turn comes up.
- The plan composition shows up on the customer's portal and (if you sync to QuickBooks) on the QBO invoice memo.
- You're ready to collect the deposit — see the next article, Collecting draw payments
What you can and can't change later
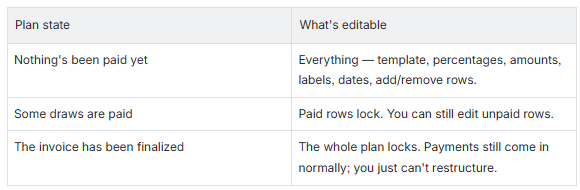
If you really need to restructure a locked plan, the answer is usually to refund and start over — see Refunds and cancelling a payment plan.
Common questions
-
"I picked the wrong template — can I switch?" Yes, if the plan hasn't been paid against yet. Open the modal again from Invoice Actions › Edit Payment Schedule and pick a different template.
-
"The 'Plan target' shows the wrong amount." The plan snapshots the total when you save. If you added line items or applied a discount afterwards, the invoice has drifted — re-open the modal, accept the new target, and re-allocate.
-
"Why is there an extra penny on the last row?" When percentages don't divide evenly into a dollar amount (33.34% of $1,000 = $333.34), Sera puts the rounding on the first row so the total still adds up exactly. It's by design.
-
"My customer wants a flat $1,000 deposit, not a percentage." Switch to By Amount mode. Enter $1,000 on row 1; Sera computes the rest.
-
"The Configure Payment Schedule button isn't showing on this job." Three possible reasons: (1) the job's department doesn't have Progress Billing enabled in Settings, (2) the technician's preference is off, or (3) the invoice has been finalized and the plan is locked.
Collecting Draw Payments
What this does
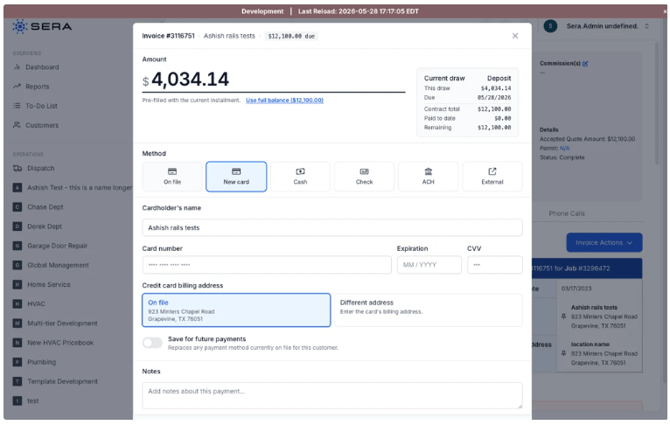
When a job has a payment plan, the Accept Payment modal knows about it. It pre-fills with the current installment amount, shows you which one the customer is paying, and warns you if the dollar amount doesn't match. After the payment lands, Sera marks the installment paid and rolls the plan forward to the next one — no manual bookkeeping required.
Before you start
- The job has a payment schedule attached (see Creating a payment schedule for a job).
- The customer is ready to pay — they've handed over a card, written a check, etc.
Open the Accept Payment modal
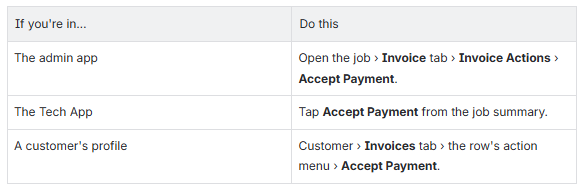
The modal at a glance

What happens when you click Charge
Sera applies the payment to the current installment first. If the amount you entered is larger than that installment, the extra cascades onto the next installment — and so on, until it runs out. There's no "credit on file" left over; every dollar lands somewhere specific.
An example: a customer is on a 3-stage plan of $1,000 / $1,000 / $1,000 and pays $2,500.
- Stage 1 ($1,000) — paid in full.
- Stage 2 ($1,000) — paid in full.
- Stage 3 ($500 of $1,000) — partially paid, becomes the new current draw.
The three warnings (and what to do about them)
The modal watches your amount and shows a yellow banner under the Amount field when something looks off. All three are informational — you can click Charge anyway if you really mean it.
-
"This is less than the current installment"
- The customer is paying less than the current installment is asking for. After the payment, the installment stays current with a smaller remaining balance. Use this when the customer wants to pay something today and the rest later.
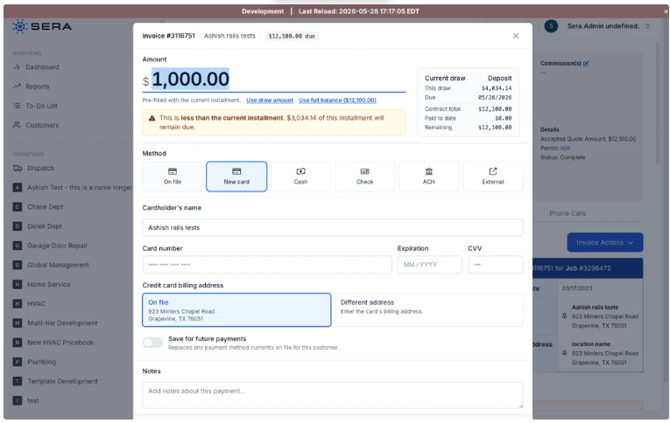
- The customer is paying less than the current installment is asking for. After the payment, the installment stays current with a smaller remaining balance. Use this when the customer wants to pay something today and the rest later.
- "This payment exceeds the current installment"
- The customer is paying more than the current installment. The extra will land on the next installment automatically. Use this when the customer wants to pay ahead — for example, they're settling up the whole job in one go.
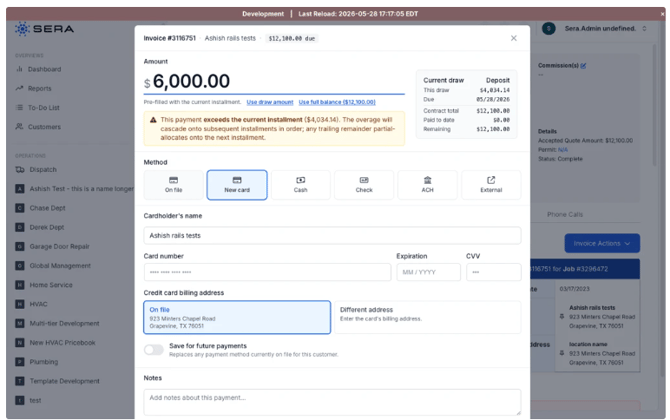
- The customer is paying more than the current installment. The extra will land on the next installment automatically. Use this when the customer wants to pay ahead — for example, they're settling up the whole job in one go.
- "This exceeds the invoice balance"
- The customer is trying to pay more than the entire invoice is asking for. The warning reads: "Overpayment is not permitted." Reduce the amount before charging.
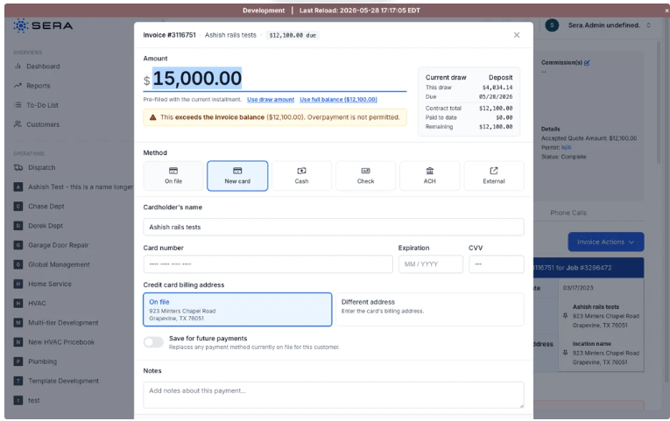
- The customer is trying to pay more than the entire invoice is asking for. The warning reads: "Overpayment is not permitted." Reduce the amount before charging.
Paying a future installment
If the current installment's due date is in the future (the customer wants to pay the deposit early, before the system thinks it's due), the modal won't show any warning. The Current draw panel just shows the future date, and the payment goes through normally.
After the payment
- The installment marks as Paid if you fully covered it.
- If you partially covered it, it stays current with the new smaller remaining balance.
- The next unpaid installment becomes the new current draw.
- The customer's invoice and portal refresh on next load.
Common questions
-
"The customer paid the whole invoice in one go — do I need to mark each stage paid?" No. Click Use full balance, confirm the cascade warning, and click Charge. Sera marks every stage paid automatically.
-
"My customer paid by check and we want to record half today, half next visit." Enter today's amount, pick Check as the method, click Charge. The partial-payment warning appears — that's expected. The remainder stays due on the current installment for next time.
-
"Can the customer skip the deposit and pay a later installment first?" Not directly. Sera always applies payments to the oldest unpaid stage first. If you enter a "later stage" amount, it lands on the deposit, then cascades forward.
-
"The Accept Payment button isn't showing." Either the invoice hasn't been finalized yet, or the customer doesn't have a balance due. Finalize the invoice (Invoice Actions › Approve Invoice) and try again.
-
"Does the payment method (card, cash, check) change anything about the plan?" No. The cascade-allocation works the same for every method. The transaction record stores the method for receipts and accounting; the plan doesn't care.
-
"I made a mistake — can I undo a payment?" Yes. Void the transaction (if it hasn't deposited yet) or issue a refund. Both are covered in Refunds and cancelling a payment plan.
Refunds and Cancelling a Payment Plan
What this does
Sometimes a customer pays for a job and then needs that payment back — they backed out, you couldn't complete the work, an item came back damaged. Refunds in Sera always go against a specific past payment. With a Progress Billing plan in flight, you have one extra decision: keep the plan running, or cancel the rest of it.
Before you start
- The customer has at least one payment on the invoice you can refund against.
- You know how much you're refunding (full or partial).
- You know whether you also want to cancel the remaining installments.
Open the Refund Modal
- Open the invoice.
- Scroll to the Payment History section.
- Find the payment you're refunding against and click Refund on that row.
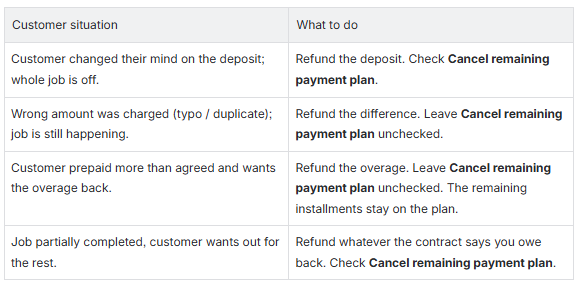
The Refund Decision Tree
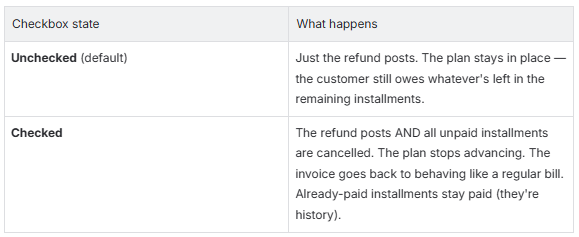
The "Cancel remaining payment plan" checkbox
This is the new piece of the refund flow that's specific to Progress Billing. It appears in the Refund modal only when the invoice is on an active payment plan.
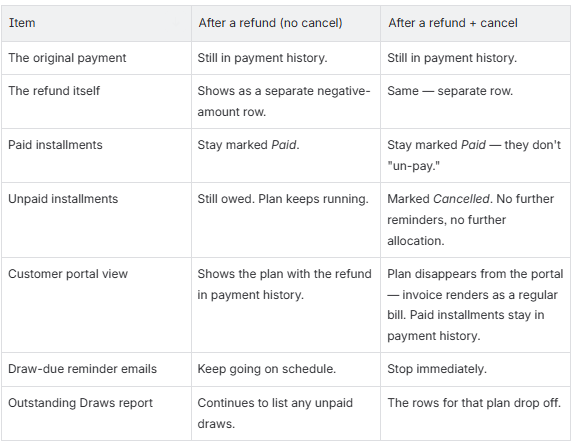
What stays on the customer's record
Refunds are an accounting event, not a do-over. Here's what sticks around vs. what goes away:
Common questions
-
"I refunded the deposit but the customer is still getting payment reminders." You probably left the Cancel remaining payment plan checkbox unchecked. To stop the reminders, issue a zero-dollar refund (or void) on any future payment and check the box this time — or contact support to cancel the plan directly.
-
"I refunded by mistake — can I undo it?" No, but you can take the same payment again with Accept Payment. The plan will pick up where it left off (because the paid installments never un-paid).
-
"What about partial refunds — do they cancel anything?" A partial refund never automatically un-pays a paid installment. The checkbox is the only way to stop the plan from advancing.
-
"The customer paid by cash and wants a card refund." Issue the refund through whatever method makes sense for your business — Sera doesn't require the refund method to match the original payment method.
-
"Can I see the refund on the customer portal?" Yes. Refunds appear in the customer's Payment History as separate rows with a minus sign. They don't change the plan's draw statuses, just the running totals.
-
"We cancelled the plan but now the customer wants to restart it — can I un-cancel?" Not directly. The cleanest path is to remove the cancelled plan and configure a fresh one (or, if the invoice has been finalized, contact support)
What Your Customers See
What this article covers
Once you've attached a payment plan to a job, two things start happening on the customer's side: they get reminder emails when a payment is due, and they can see the whole plan on the customer portal. This article walks you through both so you know what to expect when a customer calls about something they saw.
The draw-due reminder email
When an installment's due date arrives, Sera emails the customer automatically. The email is sent overnight (so they wake up to it on the morning of the due date) and asks them to pay the specific installment, not the whole invoice.
What the email says
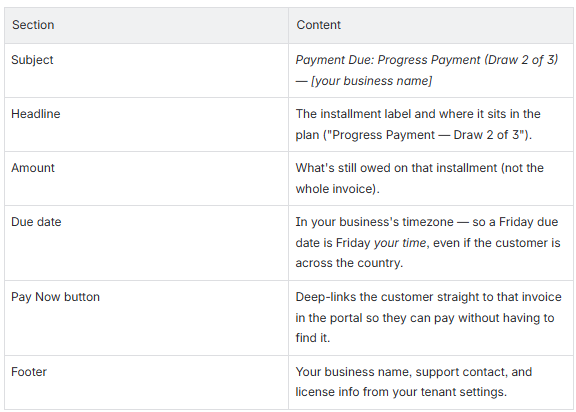
When emails do and don't go out

The customer portal
Customers can see their entire payment plan anytime they log into the customer portal. Two pages matter:
-
The invoices list
-
The customer lands here when they log in. Outstanding invoices show up first as balance hero cards; settled ones drop into the payment history below.
-
For an invoice on a payment plan, the hero card shows the current installment's remaining amount — not the whole invoice balance. The row carries a small PB chip so the customer can tell at a glance which invoices are on plans.
-
-
The invoice detail page
-
Tapping any invoice — or following the Pay Now link from an email — lands the customer here. The page is a vertical stack of cards: the amount-due hero at the top, then the plan schedule, the line items, and the payment history.
-
The hero card swaps its treatment based on where the plan is:
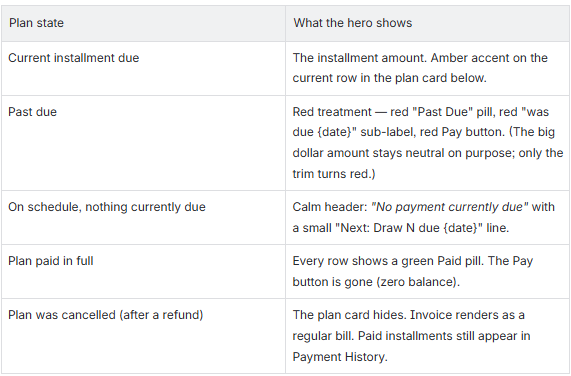
-
What the customer can and can't do
- Can: See every installment in the plan, the status of each one, what's been paid, what's still due.
- Can: Download a PDF of the invoice.
- Can: Pay any amount towards the current installment via the Pay button.
- Can't: Edit the plan. The plan is read-only from the customer side.
- Can't: Initiate a refund. Refunds always go through your office.
- Can't: Pay a future installment ahead of an earlier one — payments always land on the oldest unpaid first.
If your customer asks…
-
"Why does my due date look a day off?" The portal shows dates in your business's timezone, not theirs. A bill due on Friday in Texas may show as Friday evening to a customer in Hawaii. Tell them it's intentional and means the same date you have on file.
-
"I paid in full but the portal still shows a balance." Likely a refund happened after the plan was paid off. The plan still shows "all installments collected," but a positive balance remains. Check the invoice — there should be an info-icon tooltip in your admin view saying exactly that.
-
"I want to pay early — am I getting charged extra?" No. The portal lets them pay any amount any time; Sera always applies it to the oldest unpaid installment first. Tell them to use the Pay button and enter whatever they want.
-
"The plan disappeared from my invoice." Their plan was cancelled (probably after a refund). The invoice falls back to a regular bill; paid installments stay in Payment History. If that's not what they expected, check with whoever issued the refund.
-
"I'm not getting the email reminders." Three usual reasons: the installment doesn't have a due date set, the customer opted out of email globally, or it's the deposit (no email by design — see above). Confirm the due date is set in the admin app, then check the customer's email preferences.
-
"Can I get reminders by text?" Not yet — draw-due reminders are email-only today.
Outstanding Draws and Pending Revenue Reports
The three (3) reports at a glance
Three reports surface Progress Billing to your office, each one answering a different question.

Outstanding Draws Report
Where: Reports › Outstanding Draws (only appears once Progress Billing is turned on).
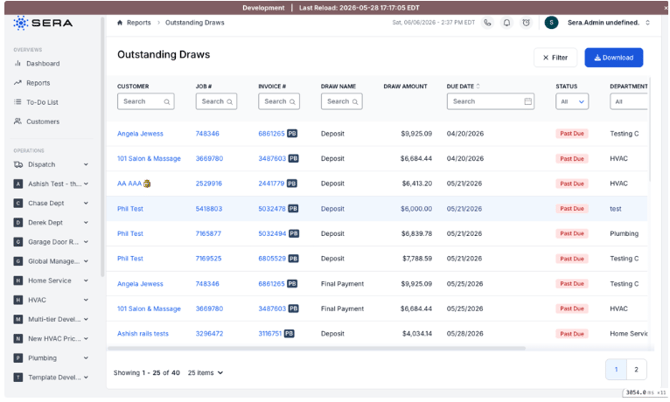
What it shows
One row per uncollected installment — not per invoice. A customer with three payment plans, each with two unpaid installments, shows up as six rows. This is the actionable list for your collections team.
The Columns
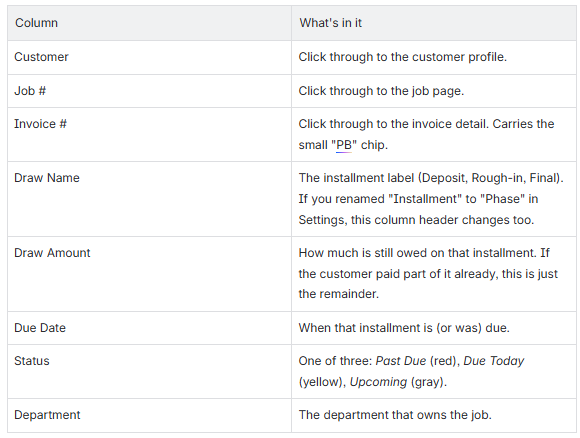
How the report sorts
By default, Past Due rows surface first, then Due Today, then Upcoming. Within each group, by Due Date ascending. So the very top of the report is always "what's most overdue."
Exporting
Click Download in the top right to export the current filtered view as a CSV. Useful for weekly business reviews or for handing collections work off to a teammate.
Pending Revenue Report
Where: Reports › Pending Revenue.

What it shows
One row per open invoice — drafts, work-in-progress, anything that hasn't been finalized yet but has a balance. Pending Revenue is "money we expect to book soon," whereas Outstanding Draws is "money we expect to collect from plans already in flight."
The new Progress Billing filter
The header row has a Progress Billing dropdown with three values:
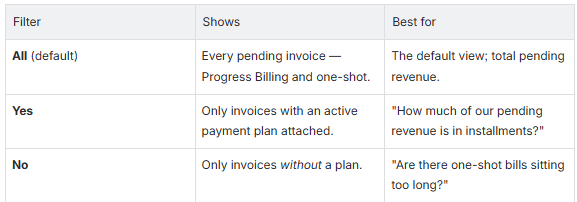
What's new on plan rows
If an invoice has a payment plan, the row carries the small "PB" chip and the Balance column gets a sub-label underneath it telling you which installment is current and when it's due. For example:
- "Progress Payment: $5,000 due 06/04/2026" — current installment, due now.
- "Next Draw: Final Payment · Due 07/09/2026" — current installment is upcoming.
- "⚠ Past Due: $2,500 — Was Due 05/21/2026" — current installment is overdue (red text).
One more sub-label you'll see on fully-collected-but-refunded invoices: an info icon (ⓘ) saying "All draws collected. A refund was issued — a balance remains." That's there so you don't waste time hunting for a missing payment.
How the two reports work together
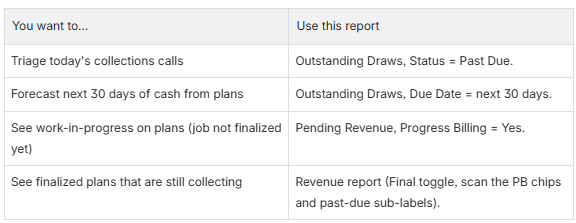
A note on Revenue
The Revenue report (Reports › Revenue) shows every finalized invoice. PB rows there get the same chip, plus the same balance sub-labels (current draw, past-due, refund-after-collection). There's no Progress Billing filter on Revenue — that's intentional. Use the chip and sub-labels to scan rows; use Outstanding Draws when you want to triage the open work.
Common questions
"Why does Outstanding Draws show so many rows for one customer?" One row per uncollected installment. A customer on a 3-stage plan with two unpaid stages will show two rows. That's deliberate — your collections team works at the installment level, not the invoice level.
"A customer's plan was cancelled — why aren't their installments showing?" Cancelled plans drop off Outstanding Draws entirely. Paid installments stay in payment history; cancelled ones don't.
"My report's column header says 'Phase Name' instead of 'Draw Name.'" Your office renamed the Interval Name in Settings. The whole report follows that rename — column headers, sub-labels, status pills. Update your training materials too.
"Pending Revenue and QBO don't agree." Pending Revenue is Sera-side. QBO has its own AR aging that may differ when QBO syncs are paused or out of date. The Sera Revenue report is the more reliable source for what Sera believes was booked.
"Can I get this report as a daily email?" Not directly today. The CSV download covers offline workflows; if you need a scheduled email, that's a request for your Sera customer success contact.
"What about Revenue by Draw — is there a per-installment revenue breakdown?" Not as a standalone report. Use the Revenue report (with the Balance sub-labels) for finalized invoices, and Outstanding Draws for what's still due.
For details on setting up Progress Billing and managing from the Mobile App, please review this Knowledgebase Article: Mobile App - Progress Billing